The domed greenhouse has the shape of a hemisphere. This is a reliable structure that, thanks to its unique design, creates the most convenient conditions for plant growth. You can build a greenhouse with your own hands, but for this you need to carry out an accurate calculation and make drawings.
The main feature of a domed greenhouse is the ability to maintain a positive temperature even in winter. Thus it is possible not to use additional heating systems. The unique design of the dome allows the air heated during the day to lower down at night and warm the crops. This is how the air masses circulate in the greenhouse and evenly warm up the entire space.

Another feature of the greenhouse design is the high stability of the greenhouse. A hemisphere with a solid base strengthens the greenhouse.
The high strength of the greenhouse makes it suitable for use in coastal and steppe climates. It will withstand severe wind and snow loads. At the same time, you can save on heating.
The domed greenhouse has the following advantages:
- High strength thanks to a strong base;
- The design allows you to evenly circulate warm air inside, warming up the room;
- You can install a greenhouse in earthquake-prone areas;
- Less materials are spent on building a greenhouse, since the side walls have a smaller surface.
The disadvantages of a domed greenhouse include the inability to plant a large number of crops in the greenhouse due to the gently sloping walls. The shape of the dome requires careful sealing, as many joints are formed. You should also carry out special calculations in order to properly build a greenhouse.
Calculations of materials for a domed greenhouse
First you need to decide on the amount and types of materials. The first step is to choose the material for the frame. Wood or metal is suitable for this. The metal frame is more difficult to mount, this requires special tools and skills. A wooden base is easier to make. It is necessary to prepare the processed wood in advance. Also, the dome can be made of glass reinforcement. You can connect the bars with each other using petal connectors.

Dome greenhouse cover material:
- Film;
- Polycarbonate;
- Glass.
It is best to use polycarbonate. It is durable, lightweight and flexible. It's easy to work with him. You need to purchase fasteners in advance. For fixing polycarbonate sheets, it is optimal to use self-tapping screws with thermal washers.
A special formula is used to calculate the area of \u200b\u200bthe dome. In practice, less materials will be required, but it is better to take with a margin. The formula looks like this: S \u003d 2π * r2. In this case, π is equal to 3.14. And r is the height in the hemisphere.
For quick calculation, you can use online calculators. It is enough just to enter the initial data.
When making a wooden frame, the wood must be properly prepared. It is necessary to treat it with antiseptics and make the necessary sections. You should also make all the calculations as accurately as possible. Otherwise, there will be a lot of gaps that will lead to structural defects.
Creating a drawing for a domed greenhouse
For the correct construction, you need to create blueprints. The geo dome is difficult to mount, so everything must be calculated in advance. With the wrong drawings, you can waste all the materials in vain.

For the correct construction of a greenhouse, you should contact a specialist to create a drawing. He will be able to take into account all the features of the site and materials.
First you need to calculate the materials. To do this, use special formulas or online calculators. The formula is created based on the hemisphere height and PI number.
Optimal dimensions for a dome greenhouse:
- Greenhouse height - 2 m;
- Hemisphere diameter - 4 m;
- For the greenhouse frame, 35 equilateral triangles are required;
- The size of the side of the triangle is 123 cm;
- You can also take 30 parts, 109 cm in size.
The frame can be bought ready-made from the manufacturer. So the installation of the structure with your own hands will be simplified. For ventilation in the greenhouse, windows must be installed. The vent can be block, have a gear mechanism or special handles.
DIY dome greenhouse construction
First, you should complete the preparatory work. You need to choose the right place and soil. The place should be well lit so that buildings or tall trees do not shadow over the greenhouse. The soil should be leveled if necessary. The top layer of soil must be removed.

The sequence of the construction of a domed greenhouse:
- It is necessary to prepare asbestos-cement pipes 165 cm long. 10 such blanks are enough.
- In the ground, holes should be dug 1 m deep. For this, a drill is used.
- Pipes need to be placed in the pits.
- Next, you need to start creating the base. Manufacturing material - wooden bar. In the construction of the base, it is necessary to rely on the drawing.
- Wooden elements must be treated with antiseptics so that the wood does not succumb to rotting, insects or fire.
- To connect the bars and to strengthen the base, you need to prepare "heels". The bars prevent the frame from moving.
- "Heels" with bars should be inserted into buried pipes. The frame should be mounted on them. It is important to properly seal all joints. When all this is achieved, you can bury the pipes with "heels".
- Frame elements should be created from the tree. On the sides of the bars, you need to make cuts for the connectors. They hide metal parts inside the greenhouse. The connectors can be purchased at a store or made by yourself.
- We must not forget to process wooden elements.
- On the base, you need to mount the connectors at the joints. Metal bolts are used to secure them.
- Then you can proceed with the installation of the frame. All work should be done as accurately and correctly as possible. It is necessary to provide space for doors and windows. At first, the structure may seem completely unstable, but when all the elements are connected, the frame will be strong enough.
- The plinth must be sheathed with boards and additionally insulated.
- Next, you should make windows and doors and fix them on the frame.
- Final work - covering the greenhouse with polycarbonate.
This completes the greenhouse installation. Further work will be related to the internal arrangement of the greenhouse. It is necessary to correctly form the beds and arrange the plants.
The beds in the greenhouse can be equipped with brick, wood, stone or slate.
You can install hanging beds in a polycarbonate domed greenhouse. Shelves for such placement can be purchased in special stores or made yourself. For watering in the greenhouse, you can organize a drip system.
Collecting a domed greenhouse (video)
The round shape of the greenhouse has many advantages. It is a warm and reliable plant construction. But the installation of such a greenhouse can be difficult. Sometimes it is difficult to cope with the work on your own, because you need to correctly calculate the materials and make drawings.
Examples of a domed greenhouse (photo)


Greenhouses have long been popular with summer residents. They come in a wide variety of types, but a domed greenhouse is very rare (in the form of a sphere). In the domed greenhouse, you can organize a place for friendly gatherings, while there will still be a place for growing plants. You can hang flower pots on the walls, and organize a small flower bed in the middle.
Do-it-yourself dome greenhouse: pros and cons
Of course, such a greenhouse is not very suitable for growing vegetables and fruits there all year round. Placing plants in it is not an easy task for an ordinary person, but it is quite possible.

The greenhouse has a number of advantages:
- Tightness;
- Keeps warm well;
- Facilitates the penetration of sunlight through its dome design;
- Withstands strong gusts of wind, snow does not accumulate on it;
- Long service life;
- Possesses a high strength index.
This unusual design will amaze everyone without exception. It will be the main decoration of your summer cottage.
But, it also has a number of its disadvantages:
- High price. There remains a lot of excess material, scraps.
- You need to place the dome over a large area.
- The design requires careful preliminary preparation: installation of the foundation, development of the drawing, calculations.
- The construction of such a greenhouse is a rather laborious process, it will take a lot of your time.
The height of the structure should be at least 160-170 cm. Otherwise, it will be difficult to be there and carry out any work.
Stages of manufacturing a dome-hemisphere
The first step is to prepare all the necessary materials: wooden slats (treated with a special antifungal compound), metal, self-tapping screws, thermo washers, hinges, polycarbonate. Then comes the creation of a drawing, calculations. Site preparation: foundation installation, preliminary clearing.

Cutting wooden slats. They must be the same length. When everything is ready, we can start making the frame: we collect triangles from the bars, immediately sheathing them with covering material: polycarbonate, glass, thick polyethylene. We fasten all the triangles together using self-tapping screws, install the door and place the structure on the foundation.
The geo dome can be made using glass fittings. A circle is attached to the foundation, fixed on the pillars. Meridians emanate from this ring. The dome resembles half a ball. The more meridians, the stronger the structure.
The frame can also be made from various materials:
- Aluminum has good strength, does not corrode, and transmits light well. But then you need to install a concrete foundation, because the material is quite lightweight.
- Wood is a widely used material for making round domed greenhouses. It lends itself well to processing, but first it should be covered with a special compound. Thanks to this, the greenhouse will last you much longer.
- Steel is used much less frequently. It corrodes, rusts quickly, but to avoid this, it is pre-painted.
The domed greenhouse is ready. Of course, it is possible not to prepare the foundation in advance, but to install the greenhouse on wooden beams, they will increase the strength of the greenhouse, and will serve as additional insulation.
Modern polycarbonate domed greenhouse
There is a wide selection of materials on the market now, and therefore coatings can be very diverse.
22.jpg)
Coverings can be made from:
- Polycarbonate;
- Glass;
- Films, dense polyethylene;
- Polypropylene foam.
The most common and widely used is polycarbonate. It has high strength, flexibility, transmits light and heat well, does not corrode, and easily withstands strong gusts of wind and snow. Many summer residents give the choice to him.
This material will be the most suitable for creating a dome.
A water tank can be installed in the greenhouse. Thanks to the shape of the greenhouse and polycarbonate, the water will gradually heat up. This is necessary to maintain a sufficient level of humidity in the room. Then this water will be needed to water the vegetables.
Round greenhouse "dome": types of structures
In such a greenhouse, all the beds and plants will be located in a circle - along the "walls" of the greenhouse, this arrangement is considered the most practical around the world. Abroad, some regard the creation of greenhouses as a work of art.

Several successful projects of round greenhouses:
- Greenhouse floating on water. Has the name "Medusa". It keeps on the water due to the barrels attached to it, it is very beautiful, and water for fruits and vegetables is supplied directly from the river using special filters with pumps.
- "Diamonds" of your garden. Named so because of its facets. This greenhouse is like a round polyhedron. It looks impressive and beautiful.
- A round greenhouse that looks like an umbrella. Some summer residents make it themselves for wintering plants.
- Greenhouse made of wire.
Along the entire perimeter of the greenhouse, special pipes can be installed, which are required for heating plants in the winter season. And for ventilation, make special vents for ventilation.
Diy drawings for a domed greenhouse
Creating a blueprint is an extremely important part of creating a greenhouse. The design itself is quite complex, but it cannot be done at random. Then the chances are high that you will simply waste the materials. But they cost money.

That is why you can contact a specialist to draw up a drawing, taking into account the characteristics of your site, the dimensions of the materials.
Before drawing up a drawing, you need to do some calculations in order to know the exact size of the structure. The size of the greenhouse can be calculated using the formula: S \u003d 2PR ^ 2.
Round greenhouse dimensions:
- Height - 2 meters. Diameter - 4 meters.
- The constituent parts of the structure are equilateral triangles. They will need 35 pieces. The size of the sides is 123 cm.
- You can make 30 triangles with an edge size of 109 cm.
The already made frame can be purchased from the manufacturer, which will greatly facilitate the work. A window-leaf installed on the roof will serve as an additional means of ventilation.
There are vents:
- Block construction;
- Powered by a special mechanism with gear wheels and a handle;
- Special handles.
Construction of a domed greenhouse (video)
You can make it yourself. As you can see, making a round domed greenhouse is not difficult. But the work is quite painstaking. The greenhouse will serve you for many years, it will be a good home for vegetables and fruits. It will become the main decoration of your site, will cause admiration, especially if you make it yourself.
The design of this building looks like a greenhouse sphere is obtained in a rounded shape due to the special articulation of the segments. A spherical structure, or as it is also called - "geodesic dome" or even "domed" is not so common in our country.
Modern summer residents know very little about it. According to experts, such a design is the most original, quite functional element of landscape design.
And this feature will be gladly appreciated by both gardeners and gardeners of our country.
Construction description:
- These parts are triangular shaped and attached to each other. Naturally, such a building does not have an ideal spherical shape.
It is made in the form of a geodesic dome - a shell that looks like a mesh surface, which is assembled from beams of various lengths.
Important. Spherical greenhouses are lightweight and mobile enough. This applies to both total weight and internal volume. Quite practical due to the fact that such structures can be easily mounted and dismantled.
- These greenhouses are a real work of art that can often be created without any problems from improvised means.
- You can make such a masterpiece on your personal plot without spending much effort. And such a greenhouse will delight you with its harvest and beautiful appearance for a long time.
As an improvised material, the following may be suitable:
- Pipes made of polyvinyl chloride.
- Wooden slats.
- Conventional metal rods.
- As far as construction is concerned, such a greenhouse sphere can have six corners.
- Often during construction, octagonal and dodecagonal spheres are made.
Council. The latter are just perfect for breaking up a greenhouse of flowers. They have a very elegant and eye-catching appearance, but the practicality in terms of heating in these greenhouses leaves much to be desired.
Another not very big drawback of this type of design may be the impossibility of efficient arrangement of the racks. In a domed greenhouse, this is not so easy to do, because it is necessary to use all the usable space to the maximum.
Why is it convenient to use the structure

Those gardeners who already have such a greenhouse on their site note that it not only has an acceptable price, but that this structure is also quite easy to assemble and disassemble.
So:
- By its structure, it is a bit like an ordinary constructor. Even ordinary cellular polycarbonate can be used as triangles. Only it must first be cut into parts of the appropriate size.
Note. As you know, a triangle is practically the most solid and stable figure. That is why anyone who has a spherical greenhouse on the site need not worry that it will last little.
- Many summer residents are interested in the question, in what place are the beds located in such greenhouses?
They are usually placed along the wall. As for the space that is in the center and remains free, usually proceed as follows.
Council. In the middle of the "geodesic dome" either an exotic tree of sufficient height is placed, or some kind of reservoir into which water is poured.
Some, in order for the spherical greenhouse to be occupied to the maximum, place an artificial pond with fish.
The advantages of such a greenhouse

What is so attractive in a spherical greenhouse for those who have already installed it on their site? And what tasks does it best solve?
Very often, most of those who have summer cottages think that such a building is inconvenient and of little functional. They believe that the "geodesic dome" is good only from the aesthetic point of view.
Among those advantages that are most obvious, the following should be noted:
- Extraordinary resistance to both heavy and destructive hurricane winds.
- This feature is due to the structure of the domed greenhouse, which is called "aerodynamics" among specialists.
- As practice most often shows, buildings with such a shape can withstand the loads caused by the wind.
- This even applies to the wind, which has an unusually destructive force (provided that the spherical greenhouse is made of materials of high strength and has excellent fixation on the support).
- Excellent illumination from any side. This property is acquired due to the fact that the configuration of the "geodesic dome" has its own design features.
Note. It is due to the fact that the plants are well illuminated that even those crops that are quite capricious in care can be grown in the space of such a greenhouse without any problems.
- The design of this structure is stylish and original. Hardly anyone will undertake to argue with such a statement.
Thanks to this design, the domed building will not only perfectly fit into the landscape that will surround it, but also make it very bright.
- "Geodesic dome" will perfectly withstand any, even the strongest earthquake.
- The temperature inside a spherical greenhouse is always at the same constant level. This feature is achieved due to the fact that the air circulates well in the dome space.
- Significant space savings (almost one third) due to the unusual design and shape of the building.
- The greenhouse structure in the form of a sphere will serve you for a long time. In addition, it is also very durable. Remarkable is the fact that this feature is achieved through the use of very inexpensive materials.
- The space inside the "dome" reaches its maximum volume.
Council. The foundation for such a building is not needed at all. The structure of the domed greenhouse is easy to disassemble and assemble. Even the most inexperienced summer resident can do this.
- This type of greenhouse is not very heavy.
The construction of a building in the form of a sphere can be used not only at a certain time of the year, like with other greenhouses. The Geodesic Dome is perfect for planting even the most capricious crops year-round.
Characteristics of this type of greenhouse

| The spherical greenhouse is very convenient to operate |
The service life is designed for 7 years, although according to statistics, such buildings last much longer |
| Excellent strength and long service life |
Achieved through the use of special materials (polycarbonate, wood, polyvinyl chloride) |
| The indoor microclimate is perfectly regulated |
Achieved by good air circulation |
| The ability to cover huge areas (up to 1 km) without using additional supports |
Achieved due to design features |
| Fast enough installation |
Possible thanks to unified parts and their markings (for this there are clear assembly instructions) |
Which is better: buy or assemble yourself?

Each summer resident has a choice - to buy or make such a round greenhouse with his own hands. In either case, he will not lose.
After all, the range of domed greenhouses offered by various companies is huge. In addition, you can always choose the required size and select the characteristics of the operation exactly for your needs.
Several recommendations:
- Very often, products of this type are made from materials that contain a polymer. It is thanks to this that not only the operational period, but also the durability of such an acquired building is at the proper level.
- But if, for some reason, you do not want to purchase a ready-made domed greenhouse, it is quite possible to do it yourself.
- You just need to follow some simple rules. First, carry out all the necessary calculations. Based on these data, it will already be possible to draw up an accurate drawing of the future structure.
- Next, it is necessary, in accordance with the drawn plan, to calculate what materials and in what quantity will be needed in order for the greenhouse agrosphere to be built.
- The most common in our time are domed greenhouses made of wood.
Council. Very often summer residents, who decided to build such a structure themselves, make it out of pipes. These materials, despite their lightness, are quite reliable.
- Moreover, you do not need to use any expensive materials for construction. In order for such a greenhouse to appear, an agrosphere pipe is suitable for the most common one, for example, made of polyvinyl chloride.
As the material for the triangular elements, either polycarbonate or polyethylene film is used, which is very strong.
As for the use of glass in such greenhouses, it is practically not used. We recommend watching a video on how you can make a domed greenhouse yourself.
The features of such a greenhouse lie not only in the original appearance, but also in some functional characteristics, which will be discussed below.
Features of the domed greenhouse
One of the distinguishing properties A spherical greenhouse is the ability to maintain a positive indoor temperature for a long time in the absence of auxiliary heating.
This effect is achieved due to the fact that in the dome structure, the air that heats up in the daytime rises up, and at night it is displaced by cold air masses, as a result of which the heat sinks down to the plants. Thus, air circulation occurs, due to which a favorable microclimate is formed inside the structure.
Another feature greenhouse is that, having a streamlined shape and wide base, this structure is able to withstand strong winds.
The wind resistance of the structure makes this structure indispensable for use in the steppe and coastal regions.
TO advantages domed greenhouses include:
- high-quality bearing capacities, which are achieved due to the uniform distribution of the mass of the structure. This allows the structure to withstand more significant loads, unlike other types of buildings;
- the stability of the structure makes it possible to build a greenhouse in earthquake-prone areas;
- the minimum surface area of \u200b\u200bthe side walls contributes to a significant reduction in the consumption of building materials.
The spherical building also has some minuses:
- the sloping walls of the structure do not allow placing a large number of beds inside the room;
- due to the presence of many joints, the structure needs careful sealing and insulation;
- preparatory measures related to the calculation of materials and components are accompanied by some difficulties, which is caused by the need to use parts of a strictly defined configuration.
Frame materials
The following options are possible here:
- Wooden slats... The advantages of this material are environmental friendliness and easy installation.
Wood parts should be treated with antiseptic agents, which will increase the life of the material and provide it with protection from moisture and insects.
- Metal... Such structures are strong and durable, but they are prone to corrosion, so metal structures also need to be processed.
- Plastic... Strong, flexible and sealed material, but also more expensive and less durable than metal.
Suitable as covering materials the same options as in cases with other types of greenhouses, namely:
- glass;
- polyethylene film;
- polycarbonate.
Polyethylene does not have the heat-insulating properties inherent in polycarbonate, however, in terms of transparency and ease of installation, it is in no way inferior to it.
Polycarbonate less transparent than glass, but at the same time retains heat well, and the assembly of a spherical (round, domed) polycarbonate greenhouse does not cause any particular difficulties.
Glass differs in transparency and durability, but it is heavy and expensive.
Preparatory activities
 Before starting the construction of the greenhouse, need to prepare the place for construction. It is desirable that this is an open sunny space.
The selected area should be cleaned of unnecessary objects and vegetation, after which the site should be carefully leveled.
The nature of further actions is due to the fact will the foundation be built for a greenhouse or not. In the case of a domed greenhouse, the construction of a foundation base is not a mandatory measure due to the lightness of the structure.
But if, nevertheless, the decision is made in favor of a more solid support, then here you can use both a strip type of foundation and a pile one.
When arranging a strip foundation, the next preparatory step will be digging a trench, while when choosing a pile model, this procedure will not be needed.
If the construction of the foundation is not provided, then the site should be covered with a protective non-woven material - this will avoid the growth of weeds. Then a layer of gravel should be laid on top of the material and smoothed well.
- dome diameter - 4 meters;
- height - 2 meters;
- the number of equilateral triangles with such dimensions is 35 pieces, the length of each side is 1.23 meters.
The calculation of the greenhouse dome is performed according to the formula for calculating the area of \u200b\u200ba circle: S \u003d π * r2. But since the structure has a hemispherical shape, in this case the formula is used for the calculation: S \u003d 2 π * r2.
Base assembly
The base is a small wall height, which along the perimeter has the shape of a polygon.
Should not be limited too few corners, since in this case it will be necessary to make large triangular parts, as a result of which the structure will look less like a dome.
Most suitable option - a polygon with 10-12 angles. As for the height of the base, there are also certain criteria here. Too low a height will cause inconvenience in handling planted plants. The best parameters in this case are 60-80 cm.
A photo
Dome greenhouses: photo examples.
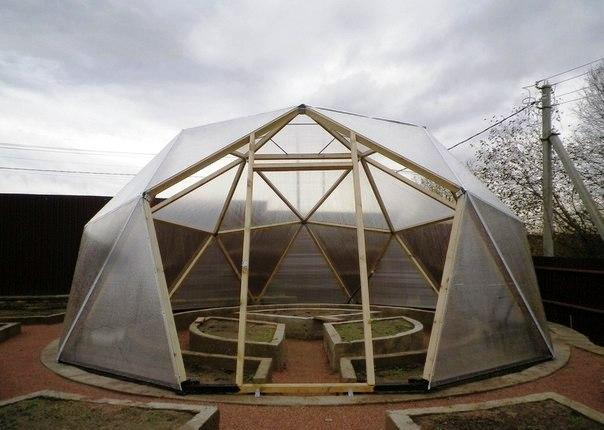

Round greenhouse-dome.

Do-it-yourself dome greenhouse: drawing.

Frame construction
How to make a geo-dome greenhouse (sphere, hemisphere) with your own hands? After calculation, this procedure includes the following steps:
- Bars are being prepared for assembling the frame. To do this, they should be cut into pieces of the same length.
- In accordance with the dimensions provided in the drawing, bars are cut for the door and window (if the presence of such is assumed in the structure being erected).
- Further, based on the size of the triangles, you should cut the fragments of the future coating.
When using a film as a covering material, it is not necessary to cut it.
- Assembling the triangles.
- The assembled parts are connected to each other using self-tapping screws. Each element should be attached at a slight angle to create a domed shape.
- The door is being assembled. If it is made of metal, then it is better to weld it, as the bolted structure can loosen over time.
- The next step is to attach the hinges to the door and opening.
- The door is hinged.
- The finished structure is installed on the base.
- The final stage - installation of the coating. Self-tapping screws are used to fix polycarbonate, glazing beads for glasses. The film is fastened with wooden clamping strips, which are nailed to the frame.
Thanks to its design features, a year-round domed greenhouse will become a real decoration of any personal plotwhile maintaining almost all the properties of standard greenhouse structures.
And here you can watch a video about domed greenhouses.
If you find an error, please select a piece of text and press Ctrl + Enter.
Friends, hello. The complexity of the topic of how to build a domed greenhouse with your own hands does not lie in the procedure, calculation or even sawing the material. And in another. Since the desire to erect this structure arises for several atypical reasons:
- If we take it seriously, the first solid reason is knowledge of dome structures and dome construction.
A landowner who operates a film greenhouse or, at best, switched to a polycarbonate greenhouse is unlikely to be interested in a new design without knowing anything about it. However, the benefits that the dome brings with it have been displaced from that of the most conservative farmer. All that remains is to get detailed information. - Next comes the spirit of experimentation. Everyone wants to try something new. And why not, if the land area allows. However, there are two things here:
- The new is the well-forgotten old. More precisely, out of sight.
- Again, knowledge.
- The third case, which can be limited, occurs with those who have already seen the domed greenhouse, entered it, tasted the result. But the separation happens again:
- On the one who believed in the advantages over a conventional greenhouse.
- And for those who did not believe, but wanted, excuse the expression, to show off in front of the neighbors.
So, building a domed greenhouse with your own hands for courageous farmers who know how to count and calculate well. For people using advanced soil cultivation technologies as well as natural plant cultivation. Here, to a greater extent, a hint of vegetable crops. Although the exotic with domed heat transfer characteristics is not far off. It's time to ask you questions: - Did you know that you can harvest three times a year in a domed greenhouse? For example, in central Russia with a pronounced summer period from late May to mid-August.
- Did you know that with a minimum winter heat supply, it is possible to plant and harvest potatoes even all year round? Moreover, electricity is optional.
But about the secrets below. And for starters, a cannon salvo from the list of the basic advantages of the dome.
About construction and materials in a simple way
The dome represents the construction of Fuller, an American researcher in the field of geodesic architectural structures. The triangular mesh shell is nothing more than a self-supporting frame. Therefore, the principles of solving the post-war housing crisis were transferred to classrooms, warehouses, hangars and greenhouses. Our domed greenhouse is based on five elements:
- Foundation. Here the opinion is divided into piles with subsequent cladding and a welded corner. The choice is yours. And I used the pile option. Building the foundation for a dome is a very tricky thing. There should be no miscalculations both vertically and horizontally.
- Caracas. A fence board is taken as the basis of the frame. It has a standard size of 100x20 mm. This is enough for a one-sided summer film package. For the winter version with double triangular sheathing, a plank thickness of 40 mm is required. Keep in mind that a smaller 40x20 end will require the use of scaffolding. And on the frame made of 100x20 boards, you can move acrobatically.
- Connectors. Don't laugh. I used shovel cuttings. The standard size is 38–40 mm in diameter. The connection was medium hard punched tape with one strip of holes.
- Film. Why was the Svetlitsa film chosen? The answer to this question lies in the analysis of film tests. In Russia, Svetlitsa shows the best results out of six types of film material. Moreover, the assessment criteria are different:
- Hydrophilicity. Condensation drops do not fall from the Svetlitsa.
- Rigidity. The film pack withstands surface tension on the nail under its own weight. A frame 50x30 cm was taken as a sample.
- Transparency. Svetlitsa has the highest score. Light loss is 10%. And polycarbonate has all 40%.
- Price. A square meter of film costs about 100 rubles, taking into account the thickness. My choice fell on a thickness of 120 microns. The cost per square meter from an authorized dealer with self-pickup is 47 rubles. The exact calculation of triangles with overlapping for soldering determines the version of the running meter. It comes in different widths: three meters or four meters.
And most importantly, Svetlitsa is a perennial year-round film for greenhouses. Service life 7 years. - Hardware group. I used self-tapping screws 4 cm long. There are recommendations to crush the screws with a drill at the end. This will prevent the grain from cracking the wood. But everything requires skill and experience. With careful work with a screwdriver at the right speeds, the percentage of cracking will be minimal. I, at least, chose self-tapping screws with a small thread pitch.
What tools are required to build a domed greenhouse with your own hands

So let's move on to the calculations. They seem complicated to you, but all the dimensions are in your hands, more precisely, in the memory of the calculator for calculating the dome.
Payment
With the increasing popularity of dome building, the automatic calculation algorithm has become widespread in many languages \u200b\u200band servers in different parts of the world. A query in the Internet search engine will give several options at once. They are actually the same calculator. To compile data, you need to specify the radius of the sphere. The rest of the parameters reflected in the three-dimensional drawing are intuitive:
- Frequency of triangles.
- Partition class.
- Axial symmetry.
- Part of the sphere.
- Connection method.
- Connector diameter.
- Rib width and thickness.
It looks like a children's construction set, only in an interactive form.
The measurement results will reflect the coverage and base area, as well as the volume of the lumber and the total length of the ribs. Drawings of edges, triangles and vertices will be reflected just below. As you study the calculations of the calculator, you will understand that you need to start from the standard sizes of materials:
- Board lengths.
- Length of the handle for the connector.
- Film area and dimensions.
- Pile lengths.
The main thing is to fit the main elements of the structure into uncut material with the least residue. The number of self-tapping screws is calculated up to plus / min five pieces. Although the stock will not hurt. Film triangles can be glued together from leftovers. But here I do not recommend doing this:
- Many people forget about overlaps.
- Gluing the two halves together is a time-consuming task.
- The glued triangles are inferior in safety margin. Especially in the winter.
I glued from the halves. Saved money. But not time and nerves. Now let's move on to the main part of the description. This is a do-it-yourself dome greenhouse assembly.
Assembly order
The acquisition of materials is a master's business. Where, how and how much to decide for each individually. Therefore, I will omit the information. But there were nuances. I bought most of the consumables at a hardware store. I bought boards at a sawmill. But the film was delivered to me from Moscow to order. Your option may be more practical. Still, the dome is a subject of economy. If you prepare all the elements, all that remains is to collect them. And now it's time to describe the order of construction actions:
1. Foundation. For ten piles, one six-meter rectangular profile was required. After cutting, the length of each pile was 60 cm. The supports were deepened by 40 cm. It may seem that this length is not enough for reliability. However, the canopy, as a self-supporting structure, redistributes the weight proportionally. Moreover, the stress on the piles remains to some extent within the frame elements. The main thing when installing piles is to set the level. Even millimeter deviations will be noticeable. What happened to me. Three points of support of the dome were in a suspended state. But this did not affect the strength of the greenhouse in any way. Yet a lot depends on working with a sledgehammer. As far as vertical alignment is concerned, it is much more complicated. I initially did not fill up the construction site and built the greenhouse in a landscape with natural unevenness. The accuracy of the installation of the piles was checked with a perimeter assembled from the lower row of ribs. The error was obvious. The differences in height gave an error. The ribs did not meet. I had to re-hammer half of the supports. Consider this point.


2. Installation of the frame on piles. There are many installation methods. As far as fantasy is enough. But reliable robust options have an obvious advantage. I'll tell you how I did it. In a connector with four petals, I sawed two grooves to fit the end of a square pipe.

I put the connector on a pile. Further, in order, I mounted the first row of ribs. The assembly of triangles has its own sequence.


You cannot collect the next row without completing the previous one. Do not tighten the screws to the end. Since the alignment of the ribs due to their natural unevenness requires a backlash in the connector. Each petal is screwed onto two self-tapping screws. Near and far from the center of the connector. Two points where the far one is fixed at an angle give rigidity.

Frame installation is a very exciting experience. But the beginner faces the difficulty of connecting the edge points of the ribs at any level. Therefore, I can advise this: do not overdo it with tightening the screws. They will probably have to be weakened, and more than once. And the tree doesn't like it. To assemble the vertex, you will have to use additional forces to pull or move the connection points away from each other. Don't be alarmed if the ribs don't meet.


With proper sawing, the problem is easy to solve. It is necessary to loosen the previous hitch nodes. The process of assembling the wooden part of the dome is difficult to describe, since it is understandable only through direct contact with the object. Remember to be precise when cutting material. Otherwise, the dome will not collapse. The way of moving along the frame under construction is individual. The choice is between woods and acrobatic tricks along the triangular segments. The second option is available to builders with a small body weight.


3. Board sheathing. The assembled frame is very tough and strong. A further question arises: to glue the film or create a board by sheathing the piles around the perimeter? The introduction of soil into the greenhouse is possible only in the second case. I sheathed the perimeter with strips of galvanized iron 20 cm wide and 200 cm long. The only inconvenience was that I had to sit or kneel. The sheets were sewn in two fastening lines:
- On a pile in pre-installed brackets.
- In the lower ring of ribs, which at that time was reinforced with an additional longitudinal rib.
For installation, I used a metal drill with a diameter of 3 mm and a screwdriver. In those places where the sheets did not converge into a single line, I cut them and mounted them from new points. Between the piles, I fastened wooden beams to strengthen the sheathing.
4. Film. Film bonding is the most difficult process. And if you have never worked with a building hairdryer or stretch ceilings, then you should practice before doing it. Mounting the upper pentahedron from half triangles was my mistake. They were glued together at home in advance. The fact is that I saved on film, taking into account the remains from which I collected the triangles. I do not advise you to do this. A solid triangular sheet is less capricious in gluing. And so on. Order film only for whole segments. Yes, there will be scraps, but they are not worth it. With each new gluing, I mastered the hard art. Indeed, at maximum heating, the film shrinks or burns out. If insufficient, it does not stick. Experience comes quickly. Especially if you are limited in expensive material. The bottom row of triangles turned out to be great. Consider the maximum overlap in the vents. The main thing is to try to be less nervous when gluing. This is a really difficult process.
5. Installation of vents and doors. The segments that open are the same triangles, but without connectors. The ribs in them are located in the same plane and fastened with punched tape. Three small canopies were used for each door. To attach the vents on the second tier, I used a ladder. I did this carefully so as not to tear the film. I glued a strip of rubber insulation around the perimeter of the vents and the door to protect it from heat loss and rainwater. There were no problems at this stage of construction. However, fixing the elements in the open state, necessary for airing the greenhouse, made me think. Your option is your fantasy. Just remember, when the window is open, windage occurs. First of all, the window itself. The ventilation holder must be very strong both on the vents and on the door.


The mistakes I made
Even without much experience in construction, the greenhouse was amenable to assembly. But mistakes were inevitable. The insidiousness is that they showed themselves after assembly.
I will list them:- Failure to set the exact pile level. Unlike other designs, the dome does not like errors.
- Excessive tightening of self-tapping screws when assembling the frame, which led to cracking of the wood or inconvenience of connecting the closing points.
- Gluing of triangular segments from shreds. I wouldn't do that now.
I forgot to say that the soil for planting is applied before the film is glued. It is easier to spread it around the perimeter. Take care of the fasteners inside the greenhouse. They are required for tying plants or hanging watering cans, bottles, garden clothes. In fact, this greenhouse option is far from perfect. After all, the dome can be equipped with a rainwater outlet around the perimeter, since the structure collects the maximum amount of water during rain. The drip irrigation system will not interfere. But this topic intersects with the operation of the building. And there indicators of temperature, humidity, illumination and characteristics of growing certain plants appear. You understand that this is a different story.
The advantages of a domed greenhouse
Their description is easier through comparison with the arched greenhouse made of polycarbonate and metal profiles, which is widespread today. The yield in a dome with your own hands is 4 times higher than under a polycarbonate arch. This is due to several factors:
- You can start planting plants a month earlier.
- The harvest season will end a month later.
- If in an ordinary greenhouse the last tomatoes remain green and freeze, then in the domed one everything ripens.
- If the number of tomatoes from the same number of bushes in a regular and domed greenhouse does not differ, then the size of the fruits in the second is much larger.
- Proper dome design collects light over the entire area as well as the entire length of the sun's movement. That is, for the entire sunny day. When, as a polycarbonate construct, it takes light only at an angle of 90 degrees.
- In an arched structure, the total heat due to the shape is at the level of 1-1.2 meters, and even higher with a square base. In the dome, due to the reduced air volume, the heat is at a level of 0.8 meters and below.
- The dome heats up faster and gives off heat longer. Since the dissipation area and heat loss is lower than that of an arched structure. At a temperature in the arched greenhouse in the morning the temperature is +5 degrees Celsius, then in the dome greenhouse it remains +20 from the night.
- On the economic side, the benefits are obvious. Polycarbonate material is taken as an example. It is also used in the construction of the dome. Film remains a more practical material, though. So, a domed greenhouse with a diameter of 6 meters and an area of \u200b\u200b27 squares would take 4 sheets of polycarbonate. And on the arched area of \u200b\u200b18 squares there are also 4 sheets of plastic covering. The dome structure comes out 30% cheaper in materials.
- By the way, the material for manufacturing is widespread in hardware stores.
- DIY assembly is pretty simple. Erection is available to everyone. Even alone. All that is required is the ability to work with a screwdriver. The film option involves the operation of a building hair dryer. Oddly enough, the preliminary calculation takes more mental effort. However, today there are interactive dome calculators.
- Construction time. Assembly and preparation of elements takes 5 days. Manufacturing - 2 days. In total, it turns out a week. That is, for a week of creative, fruitful work, you get a greenhouse with a round base with a diameter of, say, 8 meters and an area of \u200b\u200b50 squares.
Simply put, low mass and large interior space that follows the movement of the sun.
Conclusion
When assembling a domed greenhouse with your own hands, do not rush and rush to cut the material. The preparatory work should take longer. And the calculation is best done several times in a row during the week. In any case, not a single mistake in calculations or construction will discourage your desire to build a domed structure.


