December 3, 2015 What exactly do you associate with a masquerade ball? With something...


A declaration of love on Valentine's Day or just a beautiful greeting is one of the most romantic things, although it has already become quite traditional. They need a decent wrapper. And in the literal sense.
This DIY heart envelope is one of the best packaging for cards and valentines.
Look, your declaration of love or just warm words of congratulations will be sealed in such a beautiful frame. Such a wrapper will make your heart stop at the stage of delivery. By the way, the seal can also be made in the shape of a heart.
To make an envelope from a heart, we need a blank - a paper heart. It is shown in the picture below. Please note that it needs to be stretched up and down a little. The picture can be saved and used as a template or take a stencil.
Then we fold the two halves to the center, as shown in the diagram. We bend the upper part of the heart to the lower pointed part. It remains only to bend the tongue of our hand-made heart envelope.


In the spread it will turn out like this. Now you can put it inside or write or a confession directly on the sheet.

Do not forget about the colors and decorations on this day. Your holiday and the holiday of your loved ones are in your hands!
The envelope - it is just a shell or packaging for inserting various objects or papers. Basically, we are used to thinking of an envelope as a "package" for letters or documents. But there are also envelopes made of thick fabrics or blankets for newborns.
Today we will learn how to do envelopes for different needs and let's start with the most common envelope - a paper envelope.
The simplest envelope can be made from a square sheet of paper by folding the corners towards the center. To do this, you will need a square sheet of paper of the desired size, a ruler, and a pencil.
1) Check the very center of the sheet point by measuring the distance to it with a ruler.
2) Fold the left and right sides inward so that the corners touch center point.

3) Then fold the bottom side up so that it covers the center and can be glued to two already folded corners.

4) Apply glue to the undersides of the envelope as shown in the photo. You can also use double-sided tape.

5) Fold the top corner down. The envelope is ready! This envelope can be made in just a couple of minutes. It is based on the simple principle of adding corners. Here are some more schemes for making envelopes from sheets of different shapes:

Diamond envelope

Envelope "from the heart"

Envelope with a square
To make your envelope look beautiful and original, it can be made from several types of colored paper... The most in a simple way decorating an envelope is the use of different types of paper for the outside and inside.

To work you will need:
- 2 sheets of colored paper
Old envelope as a template (optional)
Double-sided tape or glue
Ruler and pencil
- scissors

Let's get to work:
1) Cut from a sheet of colored paper blank for the outside of the envelope... To do this, you can use a ready-made template, or draw a template yourself using a ruler and a pencil. Choose the size of the envelope at your discretion, depending on what you are going to put in it.

2) Cut out from another sheet of colored paper blank for the inner part of the envelope.

3) The inner part should correspond in size to the outer, but should be slightly smaller so that it can be easy to paste inside.

4) Using tape or glue, glue inner detail.

5) Fold the edges of the envelope inward and glue them so that so that no glue gets into the inside.

With this template you can make envelopes from colored cardboard:

By adding a ribbon, you get envelopes for different occasions: for greeting cards, money, invitations, etc.

Template long envelope:

Envelope template on A4 sheet:

Can decorate envelopes colored lace or appliques:

Can be used beads and threadsto close the envelope:

Envelopes are sometimes decorated with various paper parts, made in various techniques: origami, quilling, scrapbooking, etc.

More details about quilling technique you can read.
More details about paper flowers you can read.
What could be more commonplace a gift in the form of money, however, sometimes this is the only thing that comes to mind. To make your gift original, you can place it in dIY envelope... The envelope can be beautifully decorated and signed like a postcard.

Money envelopes are usually made of cardboard and have an elongated shape so that a bill could fit into it completely... You can draw templates yourself or use ready-made templates:


We offer you some useful ideas on how to make and decorate money envelopes that will become great gifts along with their content.
Going to a birthday, wedding, christening or other event? Then the money envelope will come in handy! This original handmade gift will surely please your loved ones.
Option 1:
This simple money envelope can be made from colored paper of several colors and satin ribbons. It looks very festive, and its production will not take you much time.

To work you will need:
- 2 sheets of colored paper (one with a picture, the other plain)
Ruler and pencil
Satin ribbons in 2 colors 1 cm and 0.5 cm wide
Matches or lighter
- scissors

Let's get to work:
1) Prepare paper and tapeso that they match with each other in color. The author of this master class used to make an envelope regular wallpaper, the scraps of which remained after the repair.
Before starting work, measure the desired envelope size, width and length. AT in this case a rectangle made of plain paper was used measuring 20 by 40 centimeters... Fold a sheet of paper with the edges inward in the center, as shown in the photo:

2) Fold lateral sides inward towards the center.

3) Unfold the sides and fold the corners in the form of a triangle.

4) Unfold the envelope and stick a rectangle of colored paper measuring 20 by 23 centimeters in the center of a sheet of plain paper.

5) Fold superfluous inside the envelope.

6) Side corners in the form of triangles glue with glue to the bottom of the envelope.

7) Satin ribbon 1 centimeter wide glue in the center of the back and front of the envelope, leaving the ends to make bow.

8) On top of the wide one, stick a narrow tape 0.5 centimeters wide, also leaving the ends for the bow.

9) Process the ends of the tape by fireso that it does not crumble.

10) tie ribbons bow... Your original money envelope is ready.

Option 2:
Envelopes for money or other surprises can be made not only from paper, but also from fabric... We invite you to learn how to make an original gift felt envelope, in which you can put money, or a gift discount card.


To work you will need:
- Several small sheets of colored felt
Thick woolen thread for knitting
Buttons
Ruler and pencil
Pins
- scissors

Let's get to work:
1) Use a pencil and ruler to measure the width of the future envelope depending on what you put in it. If it is a discount card, attach it to the felt and measure from both sides 1 centimeter for a seam.

2) Cut rectangular felt blank, then fold the bottom over and pin. Slide the card inward to adjust the size of the cover.

3) Cut from the top all superfluous.

4) Trim the edges with thread, making U-shaped stitches... It is better to use threads in a contrasting color.

5) Cut out of green felt three small Christmas trees or any other details.

6) Stick the Christmas trees with the back of the outside of the envelope... Sew small buttons on the tops of the trees.

7) Outside the front of the envelope at the bottom sew on a button, and attach to the edge of the lid threadsso that the envelope can be closed and tied with a bow.

This envelope using the scrapbooking technique is easy to make at home using parts cut from paper. Scrapbooking - the technique of decorating albums for photographs, as well as various other products using paper applications, beads, etc.

To work you will need:
- White cardboard (23 x 23 centimeters)
Colored paper (23 x 20 centimeters)
Colored paper of a different shade or pattern (8 x 14 centimeters)
Plain thin white paper or thin lace
Satin ribbon 35 centimeters long
Details for jewelry (butterflies, rhinestones, beads, etc.)
Ruler and pencil
Matches or lighter
Sewing machine and thread
- scissors
Let's get to work:
1) Using a ready-made template, cut out from white cardboard blank for the future envelope.

2) Cut out of colored paper two rectangular blanks to match the top of the envelope. Blanks must be by a few millimeters less base so that they can be glued easily and so that they do not go over the edges.

3) Cut out paper of a different color two more pieces of the same width, but shorter - this will be the middle of your envelope.

4) On the sides of these parts, glue lace frill... You can use paper lace or very thin lace ribbons.

5) Glue the lace details to larger colored parts.

6) Glue all parts to outside of the envelope on the outer main cover and on the inner cover. Then walk over the edge on the sewing machine zigzag seam... You can also glue the colored part on the back outer side of the envelope, and then process it on a sewing machine.

7) Before sticking the colored part to the back side, insert between the part and the base satin ribbon.

8) Tie the ribbon in front with a bow and glue from the outside over the ribbon thin white paper rectangle with an inscription.

9) Finishing touch: decoration additional details.

The best gift for a wedding is money that can be placed in beautiful envelope self made.

To work you will need:
- A4 sheet of white thick paper
Light colored colored paper
Decorative cord
Lace ribbon
A piece of thin translucent cloth
Details for jewelry (flowers made of fabric or paper, pendant in the form of a key, bead, etc.)
Double sided tape
Ruler and pencil
Sewing machine and thread
- Scissors (regular and curly)

Let's get to work:
1) If your colored paper is not very thick, stick it on a sheet of white paper A4 size and let dry well.

2) Using the provided template or any other template, draw with back side leaf the contours of the future envelope and make a pattern. The folds are indicated by the blue dotted line.

3) Cut out the pattern. You can use curly scissors.: Tie the ribbons and cords with a bow, make a flower from a transparent fabric, attach the lace to the part in the form of a key.

9) Glue the lace tape at the top of the part, grabbing the lacethat will wrap around the envelope, so leave a suitable length for that. Glue decorations to the bottom triangular edge of the part.

10) For reliability, go through the line glued lace ribbon.

11) Glue the part to outside of the lid envelope.

12) Wedding money envelope ready! Inside it will look like this:

With the envelope design you can differently place money inside... Here are some ideas to help you make original envelopes. For example, you can use postcard, inside which glue a small envelope with money. You can write wishes on the postcard, and, looking inside, the recipient will find there cash gift.

Another option is to make the envelope also in the form of a postcard, and inside attach satin ribbons that will hold the bills.

Book of envelopes... This original idea will appeal to those who would like to learn how to save money. You can make several simple envelopes and sign them, indicating what purpose the money stored in them is for and the time when it can be spent.

Compact discs require careful handling, so it is best to place them in special cases, boxes, envelopes, or store them in a disc album. You can make simple envelopes for discs yourself out of paper.

To work you will need:
- A4 sheet of paper
-Glue
Let's get to work:
1) Place the disc to the bottom of the sheet.
2) Fold the sides of the sheet in straight linesusing the disc as a guide.
3) Fold the disc with the paper upturning it over to the other side.
4) Wrap the top, closing the disc inside the envelope.

5) Pull the disc out of the envelope and glue internal details so that there is a pocket for the disc.
6) Fold down and inward cover corners.
7) Insert the cover inside pocket.
8) The simplest disk envelope is ready!

If you want to do congratulatory disk envelope, then you can use the previous tips for making envelopes, only make the envelope large enough to fit the disc. Here a few examples original gift envelopes for disks:


Today we will figure out how to make an envelope out of paper with our own hands. Envelopes can be simple, gift envelopes, differ in shape and size, have no decorations and be difficult to decorate.
In order to do paper envelope you and your child will need a little time, materials for work and imagination.
Depending on the age and skills of the child, choose the version of the envelope that he can handle.
Remember that learning from simple to complex leads to better results and we reinforce in the child a sense of success and self-confidence.
Depending on the simplicity or complexity of your envelope, you will need base material. It can be anything: A4 paper, cardboard, colored paper, pieces of wallpaper, plain brown paper, felt, etc.
Anything that seems appropriate and beautiful is suitable for decoration: beads, buttons, ribbons, lace, sequins, pieces of twine, straws, artificial flowers and much more.
You can get by with a simple applique or drawing, then you will need paints, felt-tip pens, pencils, colored paper.
You will also need scissors, a ruler, pencil and glue.
Before proceeding with the plan, prepare a place where you and your child will sit.
The work area should be well lit and comfortable, and work materials should be at hand.


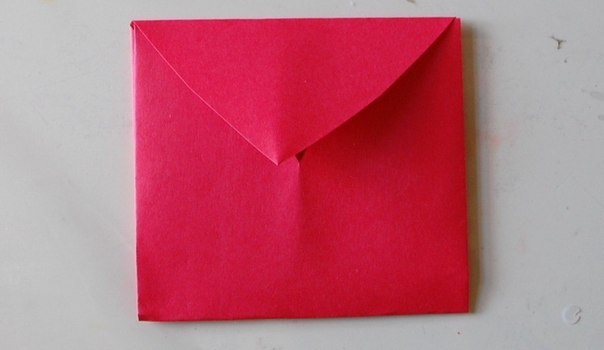
 This is a very simple way. You do not need to glue such an envelope, but simply carefully smooth its folds so that it does not open. But when the recipient opens the envelope, he will see a heart. You can even not put anything inside such an envelope, but simply write pleasant words inside the very heart.
Now you know the basic methods for making envelopes. You can experiment and come up with your own unusual options. Any of the above envelopes, even the simplest one, can be turned into a beautiful and gift envelope if you design it in an original way.
In order for your envelope to become beautiful and individual, you will need different materials. It all depends on your imagination. These can be ribbons, beads, beads, paints, pencils, ready-made bows, flowers and much more.
Invite your child to decorate the envelope himself. For example, paint it with pencils. Show that you can outline the sides of the envelope with felt-tip pens, draw flowers, or simply abstractly paint the entire envelope. Also, he can write beautiful words on the front side that you will previously help him find.  Many kids love to glue beads. Let your child prove himself. Give him beads, beads of different sizes and glue. He will be happy to create a masterpiece on his own. You can wrap threads around the envelope, gluing them evenly with glue so that they do not crumble. This option looks organic even without additional decoration. Although, no one here will set a frame for you, so you can safely glue flowers, bows and beads.
  In the process of making envelopes, you can try to do quilling with your child. Perhaps your child will enjoy twisting the paper strips, and you can get wonderful products for decorating envelopes at the exit. Wind up various flowers with your child using the quilling technique, and then give him the opportunity to arrange them on the envelope himself as he likes.
  Surely you and your little craftsman have already tried making applications. These skills will definitely come in handy here. Look at several design options together and come up with a picture that will become an applique for a gift envelope.
Origami paper heart gift envelope
Tsukanova Tatyana Petrovna, teacher of the class "Paper fantasies" MCOUDO "Spas-Demensk children's school of arts", Spas-Demensk, Kaluga regionIn this master class I propose to make a gift envelope with a paper heart with your own hands
Today God woke up early in the morning ...
He read the complaints and requests,
And to people from a jug without cheating
He poured what he wanted in his heart.
But not everyone had an open heart,
And not everyone has a place for the Miracle.
The door is supported by envy, hostility,
That greed does not allow pouring success ...
And someone's spilled to the brim
Sadness and hopelessness, that's the trouble.
And God was sorry that this heart was hidden ...
I wanted to pour love, but where?
And God was sad that people do not know how
To cleanse hearts and souls from insults ...
They turn to stone in the heart over the years
And the heart turns to granite ...
But God walked and looked and smiled
When I met lovers' hearts.
He took a jug and tried with all his heart,
He carefully poured happiness into their hearts.
And people gradually spilled
God-given grace
And everyone around was blamed for the loss,
Forgetting to look for guilt in ourselves ...
After all, if we could forgive and believe
To love, to thank and to let go
Then God could not measure happiness by a drop,
The magic jug could give everything.
Today God woke up at dawn.
A huge box with requests at my feet ...
And next to only one envelope without requests:
"Thank you for everything, my God ..."
(
Materials and tools:
Colored office paper or one-sided for children's creativity, ruler, pencil, scissors

Manufacturing sequence:
Fold A-4 sheet on a corner, cut off excess


In the blog of a Norwegian needlewoman, I found an MK for creating an envelope that unfolds into a heart. I present it to you in my free translation with small abbreviations.
First you need to cut a heart template from a square piece of paper measuring 30 by 30 cm. 
It is important to do this so that the most protruding parts of the template do not reach the edge of the paper by 1 cm.
Then we outline this template on a piece of paper (also 30 by 30 cm in size), from which we will make an envelope, and draw two horizontal lines. The first is at a distance of 12 cm from the top edge of the sheet, the second is at a distance of 10 cm from the first. Through the points of intersection of the bottom line and the line that forms the contour of the heart, draw two vertical lines.

Cut out the heart and fold it along the lines that we just drew.


The envelope is ready! It is fastened with a "ring" made of paper strip, decorated according to your taste.
back view 
front view 
If you do not want to write text directly on the heart, you can glue it inside and additionally decorate a special white sheet of paper.

The full version of the MK can be viewed by clicking on the link at the top of the page.
December 3, 2015 What exactly do you associate with a masquerade ball? With something...

Exactly 25 years ago, on June 1, 1993, in Primorye, as elsewhere in Russia, ...

OMON - a special purpose squad. The one who is in the service must be ...