To use presentation previews, create an account...


Other Nowadays, thanks to the Internet, many people have been able to realize their unspent. Unspent precisely because life offline, with hired, often far from creative labor, dries up a person’s original dreams, dragging him into the routine of everyday worries as if into a swamp.
The heroine of today's magazine story Reconomica One day she made a responsible decision that changed her entire future life. She swapped the prospect of working in an office for creativity. Now Anastasia successfully sells her handicrafts, finding numerous clients thanks to Instagram, and willingly shares his experience with our readers.
My name is Anastasia Dmitrieva, I’m 28 years old, and I’ve been around for two years now. From early childhood I had a terrible passion for painting and modeling, I studied at art school and even graduated with honors. While studying at the institute (I am a translator by specialty and an excellent translator), I always wanted to start my own business.
My dream was to open a small, unusual shop where I could offer my own exclusive handicrafts for sale. After graduating from university, I firmly decided that working in my profession was not for me. It was then that I realized that this kind of work was suffocating me, not allowing me to realize myself to the fullest.
Living in Moscow, I constantly searched on the Internet for suitable courses on special sculpting of hair accessories. Finding something really worthwhile in the capital turned out to be not so easy (in total, I spent almost 5 months on this search). Fortunately for me, my work colleagues suggested a good master, just for teaching sculpting from polymer clay .
One of my works is a bouquet of roses made of polymer clay.
The courses lasted two months and did not cost such a cosmic sum as I initially thought, but only 35 thousand rubles.
After I completed my training and received a certificate of completion of the workshop, I began to hone my skill long and hard on the weekends (after my main job), while sitting at home. To say that the entire apartment was filled with molds and special “rolling pins” for phosphorus polymer clay would be an understatement.
I am a creative person and, probably, that’s why such chaos in my apartment has always been commonplace for me. After about 3-4 months, I sufficiently honed my skill in sculpting various elite hairpins self made and decided to finally realize my dream by selling them online.
This is such an original birthday gift.
In general, I decided to do Instagram own page under online store of accessories made of luxury materials. As you already understand, it cost me absolutely nothing, which cannot be said about the first subscribers to my account purchased for advertising.
Polymer clay cost me 800 rubles in the store, per 300 gram piece. For one product (hairpin, brooch or earrings) it took me only 5-10 grams. material. On average, I sold my works from 1 to 5 thousand rubles.
When there was a noticeable increase in customers, I started making special sets (earrings + rings), baskets with flowers (all from the same phosphorus polymer clay) and small miniature vases filled with leaves and flowers.

Original composition – glass vase filled with flowers and leaves.
The clay products store began to gain momentum and moved into the status of elite handicrafts (not only jewelry, but also things for decoration).
Six months after opening my online store, I had an established clientele (through ordinary word of mouth), which brings me a very good income.
At the moment, from the day the store opened to this day, I have already earned
90 thousand rubles!
My orders can be large, for example, 3-4 medium wicker baskets with large roses and small leaves, as well as a set of hairpins and rings. The amount of such an order is about 45 thousand rubles.
I like sculpting. Since I am a creative person, it is extremely difficult for me to sit in one place, and my overflowing imagination does not give me any peace.

Earrings, ring and hair clip. Everything is made from special clay!
Since November 2017, when the first light snow had already fallen, I came up with the idea of creating fur headphones for women and children from elite fur ( arctic fox, mink, sable). I had a hood from an old fur coat.
I went online and watched several videos on how to make winter headphones with your own hands. The principle of operation turned out to be very simple and took much less time than heavy clay modeling.
Having cut the mink hood into long and even pieces, I began to implement my new wonderful idea.
Then I visited AliExpress and found the most primitive headbands for literally $5. I ordered 10 pieces at once and paid for the amount of 2,850 rubles.
The headphones arrived in a couple of weeks, without delaying the matter, I immediately began to implement it. I won’t lie, my first fur headphones looked simply amazing on my head (even much better than in the training videos from the Internet).

This is what one of my products looks like.
I decided not to stop there.
I ordered special Australian rhinestones for my fur creations (more precisely, Preciosa crystals in the shape of an oval, 144 pcs. and several round ones, 96 pcs.) All this cost me 13,000 rubles. with kopecks.
After I received my rhinestones in person in the mail, I literally ran home to quickly sew them onto the headband of my fur headphones.
I did it simply: using an ordinary thread and a needle. I immediately photographed the resulting beauty and posted it in my existing branded online store in Instagram.
The first customer for fur headphones appeared in the evening of the same day!
The cost of winter headphones today in my store is 5-15 thousand rubles. depending on the type of fur, the shape of the rhinestones and the quality of the rim on the product itself.
Of course, modeling from polymer phosphorus clay brought me enough good earnings, but, unfortunately, over time it became completely unjustified in terms of labor costs.
Any large product (basket or vase) made of clay takes a lot of time, about a whole day, sometimes even two. First, the mold must “set” and dry to obtain the desired shape. Then, if necessary, you need to apply a special flavored oil (from roses, meadow flowers, orchids, lilies, etc.).
But the most annoying thing is the frequent lack of high-quality polymer phosphorus clay in specialized stores.

Hair clip “White Rose”.
At first, when there was a huge number of orders, but there were difficulties with the material, I tried to fulfill orders using other polymer clay (of much lower quality). As a result, the shape of the flowers was poor and did not hold well. Customers, one and all, began to complain about the cracks that had formed in the clay, and many asked for a refund.
In order not to lose a good income and not fall flat on my face by damaging the store’s reputation, I decided to stop selling any clay products altogether (until high-quality material appears in stores). After such unpleasant costs with modeling and its further implementation, I radically revised my sales policy.
I’m tired of spending a day just making one hairpin or brooch.

Here's another sample!
The previous occupation ceased to bring moral satisfaction, and the pursuit of the necessary “super-quality” clay began to stress me out quite a bit.
I can't say the same about making winter fur headphones. I always have fur and rhinestones in stock, and if there is an urgent need, I can always order any more material that has run out for them.
Surely every second of you knows that on AliExpress a large number of similar product. This allows me not to worry about a shortage of consumables (unlike the phosphorus polymer clay business).
By the way, on average it takes me from 2 to 4 hours a day to make fur headphones alone. Plus, there is a colossal return on the initial cost of consumables.
As I wrote above, summing up all my experience, the income from the sale of my products, in general, I get quite good. But if we consider everything from the point of view of profitability and prospects, then
Today, the business of selling winter headphones brings me much more profit (and even moral satisfaction).
My store selling high-end polymer clay jewelry is still alive, and I sometimes fulfill large orders for my old clients.
Nevertheless everything free time I am now investing only in the development of my new, I repeat, very profitable business on fur headphones.
In conclusion I want to give a few useful tips for those who decide to follow my example:
The point is that ordinary glue rhinestones They dry out quickly and will soon fall off. In addition, if they are bought in a cheap store, they will not have an impeccably beautiful shimmer and shine. As a result, you will lose clients, and your reputation will decline quite rapidly.
And we will tell you how to make fur headphones with your own hands in just an hour!
✂ Faux or natural fur
✂ Scissors
✂ Tailor's chalk
✂ Synthetic winterizer or any other filler
✂ Headband with a fabric surface, for example velvet
✂ Thread and needle for sewing
On a regular piece of paper, draw a circle with a diameter of approx. 10 cm and cut out.

Place the circle on the wrong side of the faux fur and use Prtnov chalk to trace the contours of the pattern. Or use any round object of a suitable size, as shown in the photo.

Cut out 4 pieces with 1 cm allowances.
Place the fur pieces with right sides facing each other, paying attention to the direction of the pile. Pin or baste, and then stitch, leaving a small area open for turning.

Turn the headphone parts right side out and fill them with padding polyester. And then put the pieces on the base of the headband on each side. Sew up the open hole by hand using hidden stitches, while carefully sewing the “ears” to the fabric base of the headband.


When choosing fur headphones instead of a headdress, remember that this accessory is directly related to sports, youth and casual style!
Headphones made of long-haired or natural fur look more impressive.
If you want to add a touch of glamor to this accessory, decorate the headband with beads, rhinestones, and chains. To decorate leather-covered headbands, use adhesive decorative elements.
Source and photo: reniqlo.co.uk
Fur has been a fashion trend for several seasons in a row. Products made from it are especially relevant in the cold season. , shoes, hats, mittens, outerwear- all this will not only warm you up, but also give great mood to its owner, because it looks incredibly beautiful and impressive. Another bright accessory of their fur is fur headphones.
It’s impossible not to pay attention to winter headphones. They look wonderful on both children and adult young ladies, giving the image a certain zest. Large and small, voluminous and not very voluminous, in a discreet color scheme or bright colors, with natural expensive fur or faux fur - everyone will be able to choose a product to suit their taste. This variety guarantees the opportunity to choose an accessory for almost any look, because it will look great in combination with an elegant fur coat, a stylish down jacket, and a sports jacket.
Winter headphones are a great thing for practical women who, for fear of ruining their hair, do not wear a hat. A warm accessory can protect your ears and is perfect during cool, but not very cold weather.
Do you want to add a little brightness and charm to your appearance? You can purchase these headphones at your local store or make them yourself. 
Sewing fur headphones is very simple. The main thing is to have it on hand necessary materials and apply a little talent and imagination. Having already examined the headphones, you can take a creative approach to solving the issue and suggest several options for its creation.
Method No. 1. You can take ordinary headphones that are not used for their intended purpose and, eliminating unnecessary wires and cords, fix the size that is most optimal for your head. The headband can be left as is if the color matches the fur harmoniously. Otherwise, decorate it with ribbon, fabric, leather, fur, or knit a cover for it from woolen threads. Decoration can be done using craft glue or thread. It all depends on your capabilities and desires.
Applying the headphones, cut out two double circles from the fur. Sew them by hand or by machine, leaving a small piece unstitched. Turn out the finished parts and put them on the headphones. Lock it in. If you wish, you can decorate your fur headphones with a bow, rhinestones, stones or other elements.
Method number 2. If you don’t have unnecessary headphones, you can make a fur accessory in another way. Take a regular headband and attach round pieces made of hard material, such as plastic or thick cardboard, to it. On solid parts on both sides, fix circles of foam rubber, which in diameter is slightly larger than the base. Depending on the size of the resulting headphones, cut out two double pieces of fur and sew them not completely. Turn it inside out and put it on. If necessary, decorate the headband before doing this. 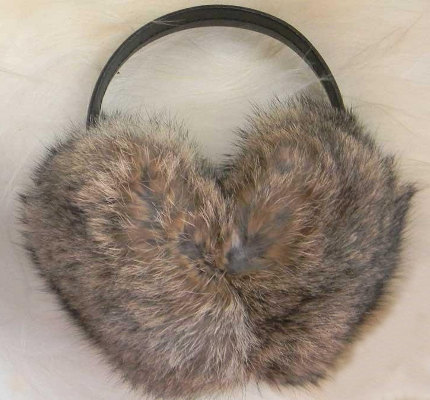
Adviсe.
Fur headphones – great way remain fashionable, stylish and original, and a hand-made accessory is an opportunity to show your design abilities.
With the onset of the cold season, many needlewomen turn their attention to winter accessories. And for good reason, because, with a creative approach, they can not only warm you up in cold weather, but also become a stylish addition to your wardrobe. One of these are warm and woolen mitts, the principle of creation of which we will describe below.
They are popular not only among little girls, but also among adult women who want to look beautiful in winter and at the same time maintain their health. Today there are many types of such accessories on the market, but the best of them are, of course, those that are made with your own hands.
To sew them, you will need these materials: a small piece of faux fur (if you have it, you can also use natural fur), a piece of felt, a very ordinary hoop, hot melt glue, scissors.
How to do: 1. First you need to fold the felt in half. Draw a circle on it, the diameter of which will be equal to the size of the future headphones and cut it out. You should get two circles, as shown in the photo below. Make two more exactly the same.


3. After this, attach the second circle to the first (you can put a little padding polyester inside, but this is optional) and also glue it, leaving room for the hoop.

4. Repeat the steps with the second pair of circles. Insert the hoop into them, having previously coated its ends with glue. Wait for the product to dry completely. Fur headphones are ready.

It is important to know: faux fur headphones can be washed in a machine or soaked by hand, while similar accessories made from natural fur are recommended to be dry cleaned, where they will be provided with normal care and cleaned from dirt.
In fact, this is far from the only method of creating decorative winter headphones. So, instead of a hoop, you can always use real musical headphones, which are unnecessarily lying around at home, or strong wire that can hold a given shape for a long time.
In addition, the surface of the hoop or the same headphones can also be decorated with a pretty fabric or tightly tied with large threads. For example, it would look like this:


Advice: Anyone who uses real fur to make winter headphones must remember that it should only be cut with a blade so as not to damage the structure.
Headphones of this type can look completely different. They can be made as described above, or you can combine methods and methods, combining fur and knitted parts, piece elements and cute additions in the form of rhinestones, pictures and other cute little things.

After all, the main thing with headphones is that they fit perfectly into your image, becoming its complement. They look good on both long and short hair, and can be matched with both casual-style items and sports and classic outfits. The main thing is to always pay attention to their color, shape and quality.

They can be made plain, colored, made of fur with long and short pile. And it’s even better to combine them with mittens, gloves or scarves made from exactly the same material.

Regarding the style and rules for choosing shades, it is better for girls with blond hair to pay attention to beige, gray and light pink tones, and for brunettes, bright headphones the color of ripe cherry, blue, orange or any other rich shades are suitable.
Another useful accessory for winter is mittens made of warm fabric. They can be worn both outdoors and at home, which makes them almost irreplaceable for those who are constantly cold even while sitting in front of a computer screen.
It is not difficult to notice that in most cases they look like knitted products, however, this does not mean that they can only be made by those who know how to handle knitting needles and crochet. An alternative basis for mitts is an old, useless jacket or jacket. When using the latter, the newfangled accessory will be ready in literally an hour. All you need for this:
1. Flatten out an old sweater. Measure out a rectangle measuring 30*16 cm on its lower part (on average, the parameters depend on the size of your hand). It is best to do this not in the middle of the sweater, but from the side - so that the product covers the side seam, which will eliminate the need to additionally sew the two halves. There should be 2 such rectangles.

2. Next, turn them inside out and begin sewing the side seam. True, here we must not forget about the hole for thumb. It should be located approximately 2 cm below the edge of the mitt and have a length of about 6 cm.
3. For greater convenience, needlewomen advise slightly bending the inner edges of the thumb hole and hemming them from the inside (the lapel size is 1.5 cm).
4. Finally, all seams must be securely fastened and the product turned inside out. Glamorous mittens are ready!

These mitts are suitable for all those who have to work in cold rooms or outdoors in cold weather.
Using exactly the same principle, you can cut and sew hats and mittens from sweaters. In order for the above items to fit better on your hands, as well as on your head, they should be cut out from the part of the product where there is a machine-made “elastic band”.
As an example, let's show what a hat might look like. To create it you need:

1 . Take any sweater with an elastic band and turn it inside out.

2. Attach your favorite simple-cut hat to it. Trace it using it as a template. It is important to leave 1-2 cm of fabric for the seams.


Use your old items to create new ones, and then you will have a variety of completely unique accessories that exist in a single copy. And if you want to make them as beautiful as possible, try to be careful in everything: the seams should be even and the stitches even.

A tender is a competition for the performance of work or provision of services in which...

1 .1 List of tests with description Folder: General tests => Banking tests...
![]()