Terrorists often choose crowded places for attacks. Besides...


IN Lately Silicone baits are widely used as the cheapest ones. There are several types of silicones:
To make silicones yourself, you need to have:
When heated, the silicone softens to a fluid state. If you have a gas stove, you can quickly melt it in a vessel.
When silicone appears on an open fire, you may encounter certain difficulties:
To avoid such problems, silicone should be melted in the microwave. There it will not burn, and it will not change its original color.
In this case, it should be melted in such a way that it remains fluid for a long time. To do this, leave the silicone in the microwave for a couple of minutes. After this, the vessel will warm up well, in which the silicone will melt and its fluidity will be sufficient to fill the molds.
Gypsum is the material that will help make molds for pouring. Moreover, this does not require much time or special skills. Gypsum is diluted with water to a creamy consistency, after which it is poured into a square mold made of plastic, wood or cardboard. After this, the bait is pressed into the plaster and left there until it hardens completely. After about an hour and a half, you can pull the sample out of the plaster. As a result of mold manufacturing, the following problems are possible:
Such forms can be used to make simple shapes, such as worms and vibrating tails, but to make a twister, this is where problems arise.
And this can help epoxy resin, which covers the finished form. The layer should be very thin, and the form should dry well. The form coated with epoxy resin is devoid of all the above-mentioned disadvantages. The baits are very easy to remove from it, and there are no traces of air bubbles. Naturally, the size of the bait will become somewhat smaller.
If you take too yellow and red colors, you can achieve their ideal combination.
The step-by-step process consists of the following steps:
After cooling, the silicone must be immersed in cold water, as it may lose its plasticity and remain soft.

Silicone baits are effective for jig fishing, so they are most often mounted with using jig heads equipped with hooks. The size of the jig head is selected depending on the size of the bait, and its weight - depending on the depth of the reservoir and the presence of current. The size of the hook should be optimal: a hook that is too large will not allow the bait to play when retrieving, and a hook that is too small will increase the number of fish landings. To keep the bait securely on the hook, it can be secured with super glue.
Many fishermen equip silicone double hooks, which prevents the bait from slipping off the hook. Typically, the hook is located in the center of the bait. To install a hook on a bait, you need to visually determine the exit point of the hook tip, after which a puncture is made in the center of the bait's body, followed by pulling the hook through the puncture site. After the sting comes out, the bait should rest against the eye of the hook, or against the jig head. If you do not set the hook correctly, the bait will begin to dangle on it, which is not very good, since it will have to be adjusted very often, and it will not be playable.
It is possible to have both a rigid attachment of the bait to the jig head, and a movable one, when the hook and weight are connected through a flexible connection, such as a winding ring. The flexible connection allows for more active and believable play. Sometimes such a connection is more effective and more efficient.
Silicone baits are also equipped with offset hooks. Offset hooks can be:

Offsets with a straight shape are used quite rarely and only for baits shaped like worms. In most cases, curved offset printers are used. To equip the bait with an offset tool, everything should be clearly calculated so that the bait is not too tight and does not dangle. To do this, apply the bait to the offset machine and mark the puncture site, both in front of the bait and in the center. First, the bait is pierced in front and the hook sting is immediately removed, after which a puncture is made with this sting at another point. The sting comes out from the back of the bait. On sale you can find silicone baits that have ready-made slots on the back of the bait in which the tip of the hook is hidden.
Some fishermen manage to install tees. This is a complex technology and should not be done without certain skills, as it can ruin the bait. The same is true for the installation of doubles (double hooks). Naturally, these hooks reduce the number of hooks, but to install them, you need to see with your own eyes how it’s done, then try it on some unnecessary bait, and only then practice it yourself.
Considering the fact that you can make silicone baits yourself, they are the cheapest. You can collect other types of bait at home, including oscillating and rotating spoons, as well as wobblers, but this requires special skills. In addition, such baits are difficult to paint in the desired colors. Sometimes this requires the skills of an artist. Making silicones is much simpler and requires only colored silicone and a mold. By making one mold, you can provide yourself with silicone baits for the whole season. The presence of several forms will allow you to provide silicones of various types. IN in this case, they will cost pennies.
In each individual body of water, fish have their own taste preferences and diet. If the diet can be determined experimentally, then in order to find fish delicacies, even a large fishing store may not have enough assortment.
Size, color, shape, smell, game, everything affects the attractiveness of the bait in a given body of water.
Soft silicone baits– twisters, vibrotails, worms, slugs, frogs, creatures are in every angler’s box. Gained particular popularity edible bait– baits with smell and taste. The smell attracts fish from a long distance, the taste makes the fish hold the bait in its mouth longer, giving the angler Extra time for hooking.
Silicone baits can be used to catch not only predatory fish. Using nano- and micro-sized silicone food you can successfully catch peaceful fish that feed on small animals - crucian carp, carp, tench, bleak. Lures of dark colors with the taste of salt, garlic, bloodworms, and worms are more suitable for them.
Silicone baits in the form of small fish are suitable for predators.
For pike, baits in the form of small fish from 3 to 5 inches with a bright game are more suitable:
Salty silicone will additionally attract even passive pike.
Twisters, vibrotails, small fish with a swallow tail are suitable for pike perch:
For perch:
There are silicone baits of various shapes, colors, sizes on sale with any taste, but sometimes it seems, and not unreasonably, that this or that silicone bait lacks an additional smell, a twister or vibrotail is more suitable in a different size, the coloring for a given body of water does not match optimal...
What to do?
Buy up the entire assortment of the store, given that silicone is short-lived, and sometimes even a dozen silicone baits are not enough for good fishing? Even if you have enough money, there will not be enough space not only in the boat, but also in the trunk of the SUV.
There is an exit. Making homemade silicone baits yourself at home with your own hands, especially since this process is not too complicated. Silicone (construction) melts easily and takes any shape, you can add any attractants to it, and it can be painted in any color.
From torn silicone baits you can make one whole one by gluing or sintering. It is better to use the sintering method, since the silicone hardens at the sizing site, which can disrupt the performance of the bait. This method is suitable if there is no other way out - all the catchy silicones while fishing are torn, and there is nowhere to get others.

Expert opinion
Knipovich Nikolai Mikhailovich
Important! It is important to be careful when heating silicone parts. Silicone can easily catch fire and darken.
In order to make silicone spoons using this method you will need:
In this case, attractants are added to the silicone melt before pouring into the mold.
Ready-made forms can be purchased at fishing stores. Molds with a sprue hole and channels for air to escape during pouring are designed for the manufacture of from one to several dozen baits. Forms can be purchased at prices ranging from 300 to 5,000 rubles.

Exist centrifugal shapes for making from several dozen to hundreds of baits at a time, costing from 8,000 to 15,000 rubles.

You can make a mold from plaster yourself.

Used for making lures with a smooth back.
The one-sided plaster mold is ready.

Suitable for all types and sizes of silicone baits.
The double-sided mold for one bait is ready.
The double-sided mold for several baits is ready.

Liquid silicones with hardness strong, standard and soft can be purchased at a fishing store along with heat stabilizers to increase the melting point of silicone. Thermal stabilizers help increase the fluidity of silicone, are used for filling molds with several samples.
In fishing stores you can purchase both imported liquid silicones: “SILICON FISH “ABSOLUT” at a price of 600 rubles per 1 kg, or Jig 650 rubles per liter, as well as domestic silicone “Eleplast (TV 25)” and Elastolux-M (two-component silicone) at a price of 800 rubles kg. You can add a silicone hardener to any silicone, for example from Harter (380 rubles 100 ml) to increase hardness.
An economical option - melting torn silicone spoons
After the silicone has cooled and hardened (from 12 to 48 hours), the bait is removed from the mold, and excess silicone is cut off with scissors.
Expert opinion
Knipovich Nikolai Mikhailovich
Zoologist, hydrobiologist. I am interested in fishing at a professional level.
Interesting. As a model for making your own, not yet tested baits, for the sake of experiment, you can buy children's set plastic insects, which features a variety of insects from worms and centipedes to bats.
Colors and glitter are added to the silicone melt before it is poured into the molds.
You won’t be able to make your own paint or pigment for coloring silicone.
It is better to use purchased ones, especially since they are inexpensive. You just have to choose the best price-quality ratio.

Among imported ones, we can recommend paints from “Plastikfarbe” (approximately 350-400 rubles for 35 ml), which give silicone baits bright and rich colors, fluorescent pigments from FisherGel (set of 5 pieces, 7g each. Can be purchased for 450 rubles).
Paints are also sold in dry form for dilution in water. The fat-soluble fluorescent dye BRB at a price of 3,500 rubles per kg is enough for years of fishing.
Glitter is a cheap material. You can use any glitter purchased at children's stores.

Attractants can be applied by placing the bait in a closed bag of liquid for several hours. Silicone absorbs odor well and will retain it for a long time.
Silicone bait must be placed in a closed plastic bag– a container generously moistened with attractant for at least 2 hours. After 4 hours of active fishing, it will not lose its properties in water of any temperature. After each fishing, silicone baits should be placed back into closed bags, generously moistened with attractant.
More reliable option, which does not require constant wetting of the spinner, adding an attractant to the silicone melt.

Single and double special syringes for pouring molten silicone into molds are manufactured made of heat-resistant fluoroplastic, are very convenient for direct introduction of the melt through the neck. High-quality syringes can be purchased from 800 to 2500 rubles.
There are two main ways:
Types of equipment:
Silicone bait is used using:
Knipovich Nikolai Mikhailovich
Zoologist, hydrobiologist. Graduated from Leningrad State University named after Zhdanov, Faculty of Biology and Soil Sciences. I am interested in fishing at a professional level.
Every year there are more and more fans of spinning fishing, this leads to an increase in pollution of water bodies with baits; silicone baits, which are so fashionable today, pose a particular danger. The thing is that if part of such bait gets into the body of a fish, it cannot digest it and may die. Silicone can also be eaten by birds, and this can also cause their death. In addition to everything else, a lot of bait remains lying on the bottom, because the probability of the hook getting caught on a snag or other underwater obstacle is quite high.
One author proposed a homemade option for making environmentally friendly baits. Their main feature is that after a certain time in water they completely dissolve. Of course, the composition for their manufacture is not yet ideal, but the idea already deserves attention.
Materials and tools for making baits:
- a couple of packets of gelatin;
- water;
- fish oil tablets;
- dye;
- a bowl for stirring the mixture and a stove;
- mold for casting baits;
- a tablespoon and other small things.


Bait making process:
Step one. Mixing ingredients
To create the mixture, you will need to take 3/4 cup of water and pour it into a small saucepan. If fish oil is used as a flavoring, you need to pierce the capsule with a pin or needle and squeeze the contents into the pan. Next, you need to pour four bags of gelatin into the pan.


Among other things, the advantage of this method is that baits of any size, shape and characteristics can be made. You can cast a variety of beetles, toads, fish, worms and other living creatures that fish feed on. You can also use real beetles to create the shapes.
Among the disadvantages, the most important one is that gelatin dissolves quite quickly in water, therefore, with such bait you can make about 1-3 casts, and then it needs to be changed. But this problem can be solved; you need to experiment with the composition, adding various substances to it. For example, if you coat gelatin with fat, it will repel water, and the bait will last much longer. Gelatin is also afraid of heat; it becomes soft when heated, so baits should be cooled.
The next drawback is that gelatin is quite difficult to break through with a hook; it is too hard. In this regard, it is best to immediately install the hooks into the mold, that is, cast the bait immediately along with the hooks.
Well, another disadvantage of gelatin is that if a fish takes the tip of the bait, it can bite it off and not be hooked.
To sum up, we can undoubtedly say that this technology for making baits has its place. After all, in this way you can make quite catchy baits in large quantities just in your kitchen, and very cheaply and quickly. To make such baits even more attractive, you can use various attractants.
Silicone fish baits have long been deservedly popular among many fishermen. But given their high price, not everyone can purchase such bait. And there is no need to spend money on branded analogues, if it is not so difficult to make silicone baits with your own hands under the existing conditions.

For this purpose, you will need to take the following materials in advance:
To make your own fishing baits from a polymer such as silicone, it is better to take materials offered in fishing stores. Construction silicone can also be used as a test casting. It is denser and more durable, but I do not recommend using construction silicone for purposes other than its intended purpose. Construction silicone is a product of pure chemicals and when fishing, a small piece of torn off silicone in the stomach of a fish can lead to its death. In silicones, for casting baits, mostly those components are used that do not harm fish and environment. You can also add attractants to it, which will improve its catching properties. You can also use thermoplastic positive side injection molding machines, this is the density of the material itself, and the disadvantages are high price and excessive rigidity.
In addition to expensive ones, there are also materials at an average price from which silicone baits can be cast. These, for example, include the two-component non-shrinking “Elastolux TV 25”, characterized by low mass viscosity. This property makes it possible in the production of bait to fill in any matrices, even small ones, and then give them the desired color with your own hands. I note that after setting, the volume of the material does not change. This property applies to Elastolux TV 25 in analogues, such as Pentalast 710 and Pentalast 718, which are also often used for the production of silicone nozzles, but shrink by 1.5% of the size of the mold used.

Making bait forms with your own hands has its own subtleties. At the very beginning, you need to correctly determine the correct proportion of gypsum and water. The correct ratio is 100 g of gypsum to 25 ml of water. It is also necessary to take into account that all components must have a temperature of at least 20 degrees.
Then you will need to mix the plaster so that it becomes close to the consistency of liquid sour cream. In order for the gypsum to dissolve well in water without forming lumps, it must be mixed into the water very carefully and slowly for 1 minute. If bubbles have formed in the gypsum mass, they must be removed immediately by tapping.
Problems that arise when independently producing plaster molds for silicone baits:
To ensure that the mold for silicone baits meets your expectations, you need to use epoxy resin. Using a brush, coat the plaster mold with a very thin layer. After this, the plaster container must be dried thoroughly. The use of epoxy resin allows you to smooth out the sharp corners of the matrix, solves the problem with the appearance of air bubbles and facilitates the process of removing the finished bait from the plaster mold.
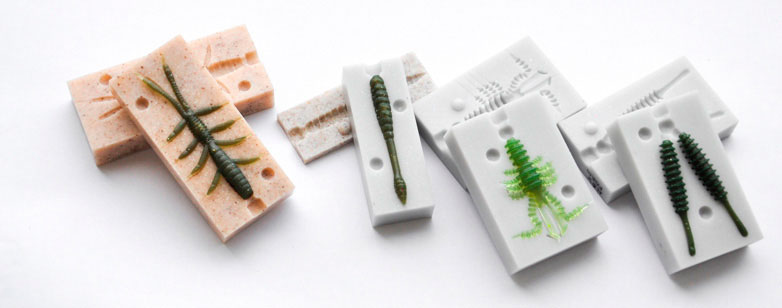
Making homemade silicone baits is impossible without using molds or matrices for casting. There are 2 main types of such containers:
To make a one-sided matrix, you need a sample nozzle. They are made mainly from clay or wood. A thin layer of Vaseline, silicone grease or grease must be applied to the existing layout so that the source material can subsequently be separated without problems. Then you need to fill the container with gypsum (the thickness of the fill should be 2 times the thickness of the sample). The model must be dipped into plaster to a depth of slightly more than half of it. Next, wait until the plaster is completely dry (this will take about 10 minutes) and remove the sample. Construction sealant must be applied to the matrix, and it will be completely ready.
Double-sided molds for casting silicone baits are made as follows. You need to take a rectangular or square container. Half the container should be filled with plaster and half of the nozzle sample should be immersed in it. Then the model must be left in the container until it hardens completely. On average, this takes about 10-12 hours. Only after this time has elapsed is it recommended to fill the next part of the matrix. The matrices should be lubricated with Vaseline or grease so that they can be easily divided into two halves. This time the solution will have to be made more liquid so that you can get rid of the bubbles without any problems.
After placing the second part of the matrix in the container, you must wait until it dries completely. To do this, you need to leave it alone for about a day. Then you need to separate the matrices, get rid of the burrs and pull out the source. The matrix fragments will dry for about several days. Construction sealant needs to be applied to only one of the parts of the matrix.
Then you need to form the sprues and air vents. Through the first cavities, prepared molten material is poured into the cavity. To make them, you should scratch a groove from the beginning of the sample to the edge of the mold with any sharp tool, which then needs to be processed with a drill. In most cases, one sprue is made per mold.
Air vents are required as a way for air to escape when it is squeezed out by the material being poured. They can be made using a thin knife. There can be about 8 of them in total. The required number of air outlets is determined in accordance with the complexity of the bait.
Such molds for casting silicone baits provide the ability to produce voluminous baits that are as similar as possible to live bait. Using a one-sided form will not achieve this effect. There are also certain disadvantages. For example, when making more complex models, there is a high probability of introducing an insufficient amount of silicone into some of the cavities of the prepared mold.
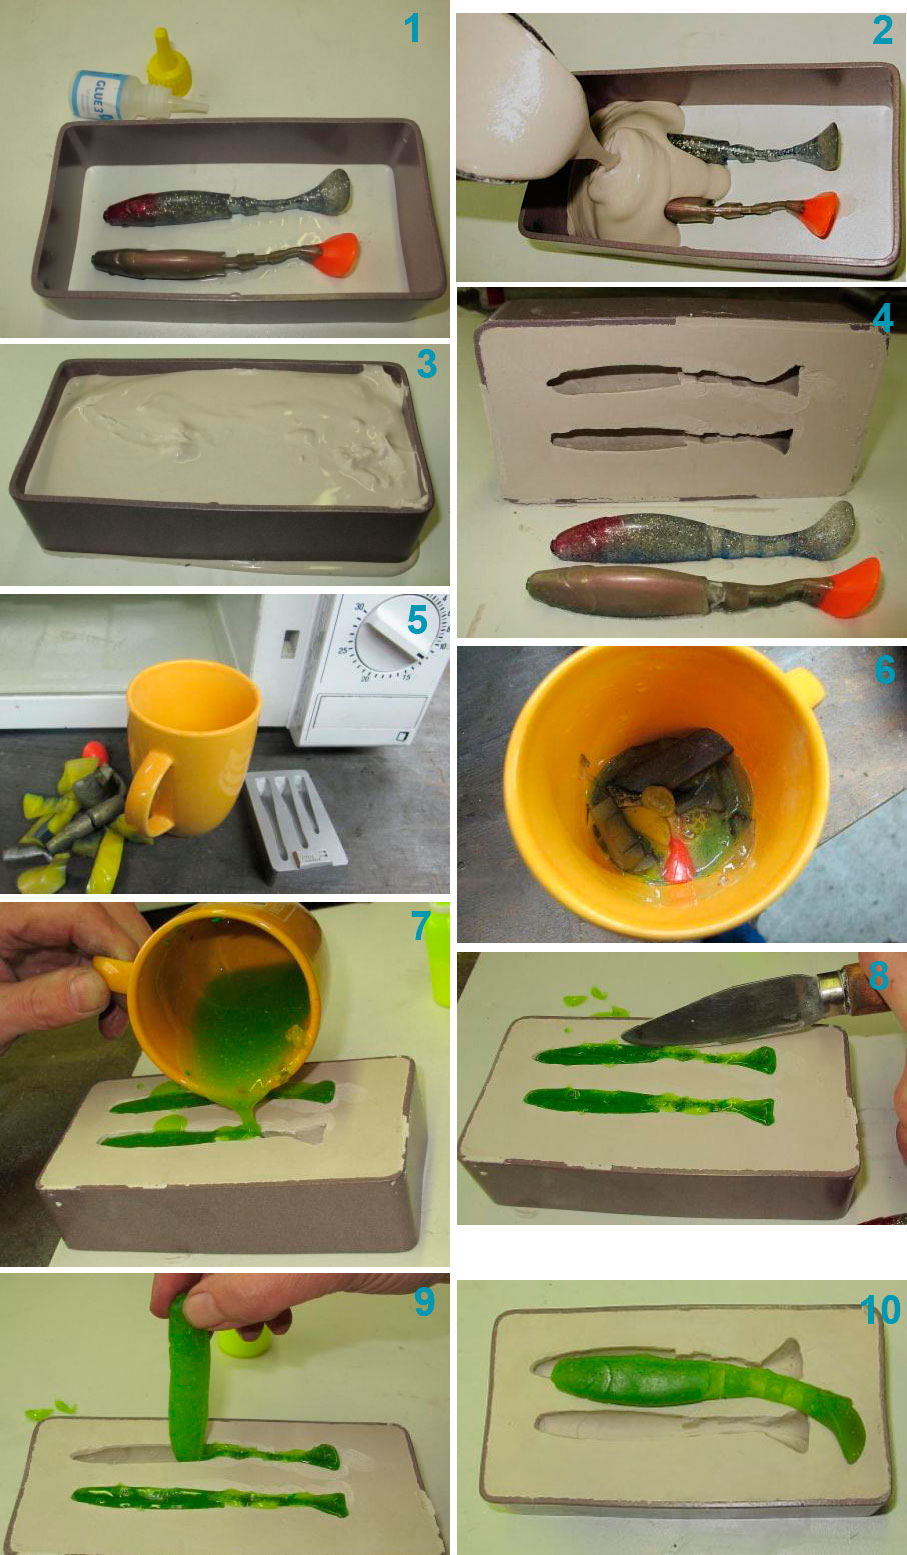
There are a number of ways that you can use to melt silicone at home. This can be done with minimal loss of time by heating it on gas stove. For this method you need to use an ordinary tin can (any tin can will do). But it should be borne in mind that this method has a number of significant disadvantages:
To avoid this, you can use another method, which requires a microwave oven. You need to place the silicone in a suitable container in the microwave, having previously set a temperature that is safe for this polymer. When melting material in a microwave oven, it is important that it is as for a long time had a liquid consistency. You not only need to wait for the moment when it completely melts, but after melting, keep it in the microwave for about 1.5-2 minutes. The container in which the material was melted must be heated as much as possible. This will help keep it molten longer.
During heating, the necessary components are added to the silicone for fishing lures - flavors, glitter, salt and fish oil, pigments for coloring the desired color, substances that allow the material used to become harder or softer.
When casting silicone nozzles with your own hands, you need to consider the following. If you saturate the bait with flavor after casting it, it will lose its useful qualities after the next fishing trip. Be sure to lubricate the bait with flavoring after fishing. This must be done as follows: the used nozzle should be washed, dried, put in a bag, with a few drops of flavor added inside. The bait will have to be left in this bag for three days in a dry and dark place.
Pouring the molten material into a homemade mold is done with a glass syringe; a plastic syringe may not withstand the temperature of the molten silicone. Silicone is poured into it and then turned upside down. The syringe plunger needs to be pulled back 1-2 centimeters and lightly pressed on it so that the material appears a little from the spout. This will push out excess air. If you ignore this point, the bait will eject along with the air, which will negatively affect its quality.
Then the mold should be turned over to the other side, the sprue of the syringe should be inserted into the sprue and the material should be slowly poured in until it appears from the air vents. After this, the form will need to be turned down. The syringe should be carefully pulled out of the mold, without ceasing to squeeze out the silicone for the nozzle. This will help prevent the bait from developing voids in the nose. Before removing the resulting bait from the container, you must wait for it to cool completely. After removing the nozzle, it is recommended to place it in a container with cold water to increase its elasticity.
Over time, after numerous fishing trips, many fans of spinning and jig fishing accumulate a variety of damaged silicone baits. It will not be difficult to provide them with a “second catchable life” by using them to produce new ones. To do this, the remains of damaged baits made from this polymer will have to be cut into small pieces and melted with any in a convenient way. The smaller the pieces, the faster the material will melt. The resulting liquid composition can then be used to cast new baits.
You can also make new baits from leftovers used while fishing (provided you have a suitable container for low tide). To do this, finely chopped old baits should be placed in a small tin can. For convenience, you can clamp the jar with pliers and hold it over an open fire, stirring from time to time until the silicone is completely melted. After this, you need to pour it into the mold, greasing it with any available fat before doing so. It is better to remove the material remaining on the walls of the jar, as it will be quite useful for future meltings. After the product has completely hardened, you need to take it out and cut off the excess protruding pieces of material with scissors. To increase elasticity, homemade bait should be placed in cold water for 10 minutes.


Each stage of casting nozzles at home must be accompanied by compliance with certain safety measures, depending on the equipment, tools and material used in casting.
If the silicone was heated in a tin can on a gas stove, you need to remove it and use a special mitten or at least a rag for this. Otherwise, there is a high risk of getting burned.
If you plan to use a syringe to melt silicone, it must be heat-resistant and absolutely intact without cracks or other damage. To ensure the required level of safety, the syringe should be additionally wrapped with electrical tape.
When working with silicone, you must use gloves to protect your hands. This especially applies to working with hot material.
In the process of melting a polymer such as silicone, harmful substances evaporate. Therefore, you need to use a respirator and thoroughly ventilate the room.
If you make such baits for fishing with your own hands, you can save a lot of money on purchasing new gear.
Fishing is not only a very popular form of recreation, but also quite expensive. Therefore, for many lovers fishing Making spinning baits yourself using molds for silicone baits is a popular activity. Here it is possible to make artificial live bait from silicone according to your own original sketch, which in terms of characteristics can surpass analogues sold on the market.
To make a silicone bait of the desired shape and size at home, the master will need two materials: silicone for making baits and plaster. The first will consist of the artificial bait itself, and the second is necessary in the manufacture of a matrix of the desired shape for silicone baits.
When making artificial fish at home, you can use either purchased silicone to make baits, or material obtained by melting down old baits that have become unusable. The second option is the most cost-effective, but will require a lot of time associated with the process of remelting the material.
Quite common materials for casting silicone baits in artisanal conditions are Pentaplast 710 and Pentaplast 718. Their prices are quite reasonable, but when they harden, the finished products shrink noticeably.
 TO budget types silicone for DIY baits also includes Elastolux (TV 25). It, unlike the first two, does not shrink significantly, and its low viscosity coefficient allows it to easily fill any elements of the bait’s shape (even miniature ones), which during subsequent coloring makes it possible to achieve maximum coincidence of the manufactured copy with the original.
If you need to get bait High Quality, then thermoplastic should be used. Silicone fish made from it will practically not be inferior in characteristics to production analogues. But in terms of price, such material will cost the fisherman more than others.
The most accessible and easy-to-handle material for making a mold into which silicone will be poured is gypsum (construction or dental). The technology for creating a mold from gypsum is quite simple, so it is often used at home:

The first disadvantage of gypsum molds is the long drying time. If you pour silicone into an under-dried mold, bubbles may form, spoiling the appearance of the finished bait.
The second disadvantage of gypsum matrices is the difficulty in imprinting small parts of artificial baits. The third negative property of such forms is their fragility. Fourthly, remove from the gypsum blank ready product quite problematic.
Epoxy resin can eliminate the shortcomings of gypsum matrices. The finished plaster mold is lubricated with a thin layer of epoxy and left to dry thoroughly for a while. After this procedure, the walls of the mold become smooth, the risk of bubbles is reduced, and removal of the finished silicone bait from the mold is simplified. But as a result of such processing of the plaster mold, the size of the home-made silicone bait will decrease somewhat.
First you need to melt the starting material to make silicone baits at home. When working with a large volume of silicone, this procedure is performed over an open fire, placing purchased material or old baits that have become unusable in a suitable container. To melt a small amount of silicone material, you need to take a glass syringe with a pre-capped outlet and place it in a microwave oven.

After the silicone has melted, the mass is poured into pre-prepared molds. If the melted mass is poured into a one-sided mold, then after a few minutes it is removed from the mold. After removing unnecessary parts, the bait is almost ready for use.
The production technology using a double-sided matrix is a little more complicated. In this case, silicone is poured into a special groove until the mold is completely filled., having previously connected its two parts. During hardening, the workpiece should be at an angle to the vertical. This will prevent the poured silicone from leaking out of the molding blank. The cooled soft silicone product is carefully removed, trying not to damage small elements.
It takes an average of three to five minutes for the silicone material to harden. This time is enough for it to pass from the liquid phase into the solid phase and be able to maintain its acquired shape during removal from the workpiece. To speed up the final cooling process, it is recommended to place the removed products in water with ice cubes. Once completely cooled, the bait is adjusted to its shape, cutting off excess silicone and giving it the most realistic shape possible.
The color scheme of future products depends entirely on the preferences of the fisherman. Self-production allows you to add various dyes to purchased material or mix multi-colored remnants of old ones silicone baits, obtaining any shade as a result of experiments. To further attract representatives of the ichthyofauna when creating silicone baits with your own hands from construction silicone, you can add small glass beads or sparkles to the source material, which will sparkle in the water.

To make the bait more palatable, artificial flavor enhancers or natural additives in the form of garlic, fish oil, and salt are added to the mixture when mixing. It is worth noting that using any type of attractant as a flavoring agent for bait will enable the bait to be tasty only on the first fishing trip. Upon contact with an aqueous environment, the flavor gradually evaporates. To restore the taste of silicone fish, you need to do the following:
This procedure allows you to completely restore the taste of the bait, after which they will be ready for use on your next fishing trip.
Working with silicone melting involves the risk of burns and mechanical damage. Also, the possibility of poisoning from fumes during the melting of old products cannot be ruled out. Making silicone baits with your own hands, Some safety rules must be followed:

 The most common way to mount silicone baits (vibrating tails, twisters, worms) is to attach a jig head to a hook. The weight of the head is selected depending on the depth of the reservoir where fishing is planned, and the length of the hook should be oriented to the size of the most unnatural bait. For reliability, some fishermen additionally fix the artificial bait on the hook using waterproof glue.
The method of equipping silicone hooks with a double hook is also quite popular among spinners. This type of equipment is mounted in the center of the bait by piercing it with one of the hooks. As a result of such installation, one of the fish hooks should be completely in the body of the silicone fish.
Lures made using silicone casting are also equipped with offset hooks of curved or straight shape. When attaching silicone to such hooks, you must ensure that its body is not too tense as a result of installation.
Baits molded from silicone can be mounted on three-piece hooks. In this case, a small hole is made in the middle of the body. The tail of the tee is used to pierce the bait and bring it out in the mouth, and one of the stings is taken out through the hole made so that the hook itself is located along the body of the silicone.
For getting quality products from silicone with your own hands and the efficiency of the manufacturing process itself, experienced specialists recommend paying attention to some important nuances. Firstly, you need to mix the gypsum solution strictly observing the proportions. Secondly, the homemade matrix should be slightly larger in volume than the prototype. And thirdly, for faster and more uniform melting of silicone, it is necessary to thoroughly grind used baits.
Attention, TODAY only!
Terrorists often choose crowded places for attacks. Besides...

Presentation “Safe road for children” Relevance The need for training...

1 of 35 Presentation on the topic: Great people of Russia Slide No. 1 Description...