Since last year, the pages of the magazine have been discussing the rules for filling out and...


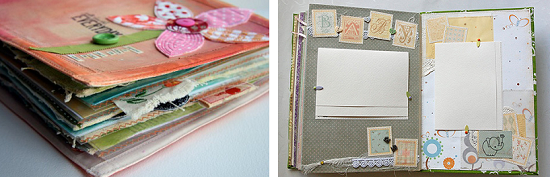
Decorations for scrapbooking - wonderful and diverse world decorative elements, improvised materials of the craftsman. When creating an album or postcard, a needlewoman can use any materials that are found in the house: buttons, scraps of lace, ribbons, pieces of textiles. Some craftswomen make the necessary elements with their own hands: they cut out inscriptions from, sculpt clay figurines, and even create stunningly beautiful flowers from foamiran.
You can buy ready-made decorations for scrapbooking. A wide range of items designed specifically for decorating frames, photo albums and other beautiful things are sold individually and in sets.
When designing a product in a classic (American) style, it is used a large number of jewelry selected by color. Pieces of braid are glued to the pages, buttons and flowers are sewn on, and there are always decorative stickers that carry meaning.
Scrapbooking in the European style is minimalistic. There is a variety of laconic backing products and contour stickers. A chipboard with an inscription or design looks good. Self-adhesive applications and glitter powder are a good help in creating a unique design.
When decorating an album in vintage style, feel free to use sentimental flowers, lace, braid, ribbons, die-cut elements, semi-pearls and, of course, suitable tags.
Democratic freestyle allows the artist absolutely everything. Stickers made from cardstock, chipboard, lace, flowers and butterflies, metal jewelry, buttons and three-dimensional figures, flat and three-dimensional stickers are used. Freedom of expression requires a lot of available material.
The work looks professional if the needlewoman uses high-quality decorative elements for scrapbooking, correctly arranging them in style and color. Using aesthetic paper clips, pins, clips, eyelets, colored double-sided tape, matching brads and corners for the cover specially designed for handmade, the master achieves a perfect result, and the composition looks harmonious.
Today I want to tell you about the main decorative elements in scrapbooking - decorations.
Chipboard(chipboard) is a dense double-sided cellulose cardboard with a thickness of 0.9 mm to 4 mm. It comes with a pattern, foil, craft. It can be painted acrylic paint, cover with liquid ink or glitter, apply powder using the embossing technique, add volume using 3D Glossy Accent clear accent varnish from Ranger.
Cutting, die-cutting- figures made of thick designer paper.
You can do the cutting yourself using a cutting machine and special knives, or you can buy a ready-made one.
Die-cuts are printed in a printing house on designer paper; as a rule, manufacturers try to include them in their collections. They may come as part of a paper set, where the die cuts are printed on a sheet of paper and must be cut out by hand. Or they can be sold as a separate set for a specific collection. Such die-cuts are printed separately and cut on a plotter in a printing house.

Flowers and leaves- widely used in work and add volume. Many scrapbookers create flowers at home using knives and a die-cutting machine, shaped hole punches, or make impressions on paper using floral stamps. In scrap shops you can find a large selection of ready-made flowers and leaves made from mulberry paper, fabric or foamiran. Paper flowers come in different sizes and shades and completely replicate real flowers. Often in your work you can find a composition of beautiful roses, on a spring card there are bright tulips, in children’s albums there are curly gardenias, and on boxes there is a composition of roses, chrysanthemums and cherry flowers.


Stickers (stickers) - a design printed on paper with a cool layer. Stickers for scrapbooking come in different sizes and with different effects - fabric, gold-plated, filled epoxy resin(epoxy stickers), with a die-cut pattern, with a glitter effect on paper, stickers with a chipboard pattern, a chalk effect. Stickers are widely used in albums, postcards, and notebooks.

Rubs - transfers (translations) applied to film. They can be applied to paper, glass, plastic, wood. Sold in sets and individually. The kit includes a stick for transferring the drawing. More information about rubbing with detailed master class you can read

Chips (tops) - the picture is glued to a metal base, somewhat reminiscent of a badge without a clasp. With the help of chips, you can highlight the main idea of the work, and the chip will also add volume. They come with inscriptions, pictures, and beautiful expressions. Manufacturers are trying to include chips in their collections.

Metal jewelry- pendants, decorative frames and pins, openwork corners - all these decorations complement your work. Pendants can be glued to the canvas when creating a composition or hung on a waxed cord and glued to a postcard, decorative frames can be used on the cover of an album, and openwork corners will become a beautiful addition when decorating a canvas or page.

Laser cutting of wood— this cutting is cut out of plywood on a laser machine. The figures can be left as is, painted with acrylic paint, covered with glitter, embossing powder or glossy accent. Cutting can act as the main or additional element in the work, for example, in an album about a trip you can glue a map of Italy and paint it in the color of the Italian flag. To express the main idea in a children's album, different inscriptions are suitable, for example, “Have fun swimming,” “First walk,” or “I’m 1 year old.” To add volume to the work, a background cutting will help; it must be glued under additional layers of paper, for example, a background cutting with bubbles can be cut into several parts, painted with acrylic paint and glued under an additional background in a sea page.

Brads- decorative carnations with legs. They come in the form of different figures and with different textures (fabric, velvet, with epoxy stickers). They are used for fastening elements on a page, fixing spreads with photographs using an anchor or as additional decor. You can read more in detail.


 Plastic (polymer) and plaster figures - act as an additional or main decorative element in the design of works. Plastic figures are made from liquid plastic or polymer clay, gypsum figurines are made from high-quality plaster.


Feathers - There are two types: short (soft, fluffy and airy) feathers from the bird’s body and long (hard) feathers from the wings and tail. Feathers come from goose, duck, ostrich, peacock, rooster, chicken, and pheasant feathers. They are painted and covered with glitter. Most often used as an accent in work, but sometimes it can act as the main element.

Buttons- come in different shapes and sizes. In scrapbooking, small round buttons or buttons in the form of figures on a specific theme are most often used. They complement the overall composition of the entire work.


Halves of pearls, acrylic droplets, drops, dots— create accents at work, most often adding 2-4 of them. They are glued to work using .

Overlay (decorative film)— acrylic film with a printed pattern. It is used to highlight the desired element in a photograph or use it as an additional decoration, for example, soaring butterflies. Overlays add layering, lightness and airiness to the work. Overlays are sold in sheets of 30x30 cm or in ready-made sets.

Knitted elements- miniature crocheted elements (flowers, leaves, napkins, booties, hats, children's dresses and suits and much more). They fill the page with tenderness, airiness and add volume, for example, when decorating a floral card under a composition with flowers or under an additional background on the card, you can glue a knitted flower or a napkin, it will peek out from under the flower and add additional volume to the work.

Paper tape (Washi Tape) - decorative tape with an adhesive layer on one side and a printed design on the other. To create such adhesive tapes, very thin paper is used. Used for decoration on pages, travel books and diaries.


Cover pendants - they are added to covers made of leatherette to add chic and elegance.

Lace - will give the work lightness, elegance and volume. Lace can be cotton or synthetic. In the “Shabby Chic” style, lace is one of the main decorative elements, and when creating mixed media works, lace is often glued for texture. It can be aged or painted with sprays and paints, or individual elements can be cut out, for example, an embroidered design.

I only talked about the basic and frequently used decor, do you want to continue? - write in the comments. Thanks to all! Experiment and get inspired!
The idea of book design for postcards and photos appealed to many handmade lovers. Modern materials and the means allow you to create real masterpieces. You yourself can get to know this technique better, learn how to make scrapbooking with your own hands or learn special paper for this type of creativity.
In such a place it will be pleasant to keep memories of the most precious moments of life.
The fashionable trend in handicrafts allows you to design and create family and personal photo albums in various styles.

Using this technique you can make various crafts for your home.
His common techniques are:
You can use almost any materials in them - from colored paper to thick fabrics and dried flowers. It all depends on your imagination and the given topic.

List of tools and materials that will be needed for work
Beginners often wonder how to do scrapbooking with their own hands and where to start? For them, there are special sets of already assembled scrap paper. For this you will need special tools:
You don’t have to buy a whole set, but make all the blanks yourself. To do this, follow the instructions on how to make scrapbooking paper with your own hands.
You will need - colored or white cardboard, napkins with designs for decoupage, sharp scissors, a spray bottle with water, an iron and ironing board, thermal film.
This way you can make scrap paper of any size, color and thickness, with any design you like, significantly saving on a store-bought set.
Creating albums is a more responsible and complex task, and at the same time incredibly exciting and interesting. If you don’t have your own ideas, you can get them from master classes on making a scrapbooking album with your own hands on the Internet.
Start with simple and small compositions that do not require a lot of decor, so you can practice gluing and decorating sheets so that further complex work will be more accurate.
The choice of color and decor is a matter of taste
How to make a scrapbooking photo album with your own hands step by step:

Postcards for any occasion in life look especially touching in this style.
All you need to create an individual postcard is whatman paper, colored paper, scissors, glue and a little imagination. Depending on who it is intended for, its content and form may differ.
How to make a postcard from scrapbooking with your own hands?
Small scrapbooks look neat and are easy to use; they can be a good gift for a loved one.
You can make a scrapbooking notebook with your own hands using this master class.
All young couples want pictures from the most memorable day of their lives to last a long time. An original way to store them is offered by a master class on a DIY wedding scrapbooking album.

The most delicate decor - various flowers
The variety of decorations and small decorative elements allows you to create real handmade miracles. But many needlewomen try to make various flowers and figures on their own. For those who are not afraid of difficulties - a master class on how to make flowers for scrapbooking with your own hands.
Valentine's Day - A good reason to please your loved one with a homemade card. Make your own valentines in scrapbooking style. To do this, follow the above technique.

One of the most favorite holidays is Valentine's Day.
A couple of tips for those who don’t know how to make a scrapbooking card for February 14 with their own hands:
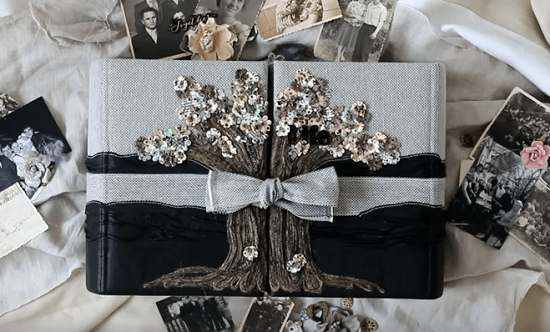
Design option family album in the form of a tree
The principle of operation is similar to a notepad or wedding album. A do-it-yourself scrapbooking genealogy book differs from them only in a few nuances.
Useful tips

Term "scrapbooking", or as it is also called “scrapbooking” comes from the English scrap - cutting and book - book, i.e. this can be literally translated as "scrapbook".
Scrapbooking is a type of handicraft art in which anyone makes and designs a photo album talking about family history in the form of images, photographs, notes, newspaper clippings and other things that have memorable value.
It is worth noting that scrapbooking can not only be tied to the creation of a classic photo album, but also album in the form of an accordion, a house, a box, as well as postcards.
Usually, when a person decides to start scrapbooking, he wants to buy a lot of things to work with.
In reality, you don't need much, or you can find a suitable replacement.
Here's what you want to have if you decide to take up this type of needlework:
1. Several types of scissors

You'll be cutting out a lot of different pieces with scissors, both large and small, which means you'll need the appropriate size scissors.
In addition, curly scissors will not hurt. You should not buy a large number of different curly scissors - 2-3 pieces will be enough to start with.
2. Double-sided tape

You will use it to fasten photographs, ribbons, letters and other details.
This tape is NOT suitable for gluing:
Small parts
Background paper
In these cases, special photo tape will help you.
In addition, in stores you can find bulky double-sided tape that will give certain parts a small volume.
3. Glue

You can choose regular or PVA glue for gluing paper.
4. Shaped hole punch

You should not buy more than 2 types of figured hole punches at once. It is worth noting that some hole punches become dull quickly. In addition, by choosing 1-2 hole punches, you will be better able to determine what suits you best.
5. Sewing machine
This tool is optional, but it's worth noting that sewing stitches will look nice on cards.
If you don't have a sewing machine, a thin awl or a thick needle will help you.
6. Ribbons, buttons, rhinestones and other details.

These little things will help to beautifully decorate your album or card.
7. Cutting mat or cardboard.

For beginners, it is better to use cardboard or scrap magazines to cut on.
8. Rubber stamps.

Also, you shouldn’t buy a lot of stamps, 2-3 pieces are enough. Buy ink pads for them. You can use plexiglass as a base for a small stamp.
To clean the stamp, use a damp cloth (without alcohol) or you can rinse the stamp warm water with soap.
9. More advanced craftsmen use a grommet installer, while beginners can purchase a grommet installation kit, which you will find in sewing stores.

If you decide to work with this tool, cover workplace a sheet of cardboard.
10. Scissors and ruler.

These tools will replace your special cutter. You can also use a utility knife and a metal ruler.

To create such an original panel, you will need a shoebox and your favorite photographs, as well as:
Scrapbooking paper (can be replaced with old wallpaper)
Roll of paper (color: brown)
Lace

1. First, cover the shoebox with brown paper. You need to lay (glue) scrapbooking paper on the bottom of this box.

2. Use cardboard to make internal dividers.

3. Now insert the lace into the sides of the box.

4. If you wish, you can decorate the box (in in this example paper flowers and butterflies were used).
You can find out how to make paper flowers and butterflies in our articles:

5. It's time to glue the photos.
6. Prepare scrapbooking paper and cut out a rosette in a spiral. Next, wrap the rose around the pencil and secure with glue.


This mini album will remind you of the most unusual and beautiful moments in your life, because all your favorite photos from your Instagram account will be in it.

It can also be used for photos taken with good old Polaroid.
You will need:
Colored cardboard (possibly with a picture), old road maps or Whatman paper
Square photos
Ruler and pencil
Double tape
Simple tape
PVA glue or superglue
Marker or pen
Washi tape
Various decorations (stickers, glitter, etc.)
1. Cut out squares measuring 13x13 cm from colored cardboard.
2. Print photos from Instagram (PostalPix will help you).

3. Glue or double tape the photos to the cut out squares.
4. Fold all the blanks, place them between the pages of a thick book so that the ends of the paper where you want to fasten the book stick out.

5. Apply glue to the ends of the paper (you may need several layers) and leave to dry.
*As an alternative, you can glue all the pages with tape, first two at a time, and then all together.

6. You can place washi tape, a strip of construction paper, colored tape, or a flat sticker over the area where you glued the pages together to hide some of the rough edges and/or glue marks.
The dimensions of this notebook are approximately 18*24 cm, but you can choose the size that suits you.

1. Prepare a sheet of thick paper and divide it into 12 squares. Use a ruler and pencil to do this.

2. Now you need to make two cuts on opposite sides, leaving 1 square to the end of the paper. Look carefully at the image to see how this is done.

3. Fold all three resulting strips into one, gluing the places indicated by the arrows.
4. Now fold the workpiece like an accordion. The arrows indicate the places where you need to apply glue to connect these parts into one page.

*You can also cut these pieces to make more pages.
5. Fold the accordion and connect all the pages with washi tape or a regular strip of paper, which you need to glue to the ends of the pages.


6. Once you have a mini photo album, you can decorate it to your liking. Use paper of various shapes and colors, markers, stickers, small memorable souvenirs that can be pasted, etc.


You will need:
Notepad (preferably with a bright cover)
Photos (choose them logically)
Markers and pens
Pencil
Ruler
Glue or double-sided tape
Washi tape
Decorations

1. Prepare everything you need to create an album so you don't have to look for it later.
2. Organize your favorite photos in a specific order, based on the number of 2-3 photos per page (than less photos on the page, the more space for decorations and experiments).

3. To create an original album, also use:
Colored tape
washi tape
Stamps of different sizes and shapes
Wrapping paper for background
Stickers - you can decorate almost anything with them if used wisely.


To make gold paper you will need:
Printing paper (any white A4 paper)
Scissors
Acrylic gold paint
Jewelry (ribbons, beads)
Brush.
1. Cover the table with newspaper, and place plastic bag. Place a sheet of white paper on the bag.

2. Prepare 5 white A4 sheets and crumple them into a ball and wet them with hot water.
3. Place wet, crumpled paper in a bowl, into which you first pour PVA and water and stir until the consistency of kefir.

4. Take out the crumpled paper and carefully place it on the sheet of paper you prepared in step 1.

5. Prepare the threads and place them on damp paper in a chaotic manner. You can put various small objects on top of the paper to create some texture, for example, you can wrinkle thin napkins, which you then place on the paper, or use dry grass.
IN Lately There is only talk around about scrapbooking.
What is scrapbooking? This is a special technology for decorating and decorating albums with your own hands using various materials.

Quite a dry formulation, isn't it? Let's take a closer look.

Nowadays, this definition has expanded significantly and includes not only the design of albums, but also the creation of postcards, decorative frames, pencil cases and boxes, collages and panels.


And one more fun fact: without knowing it, the founders of scrapbooking in the USSR were stern representatives of the Armed Forces with their “demobilization” photo albums.

Agree, it is unlikely that an ordinary store-bought photo album will be able to convey the full depth of emotions and emphasize the touchingness of the moment captured in the photographs. Weddings, the birth of a child, anniversaries, travel - all these events are extremely important in our lives.

And, of course, we want to preserve the memories of them with all the details that, alas, the camera lens could not capture, but our eyes saw and our fingers felt. For such cases, it would be better to create a special photo album that tells this story.

So how to scrapbook and what is this album?

The first thing you will notice when you pick it up is its uniqueness! Uniqueness in everything:

By creating this photo album, you are likely to relive all the positive emotions associated with the events captured on its pages.


Perhaps designing an album will seem like a difficult task that requires special skills and abilities, then first try creating a postcard with your own hands using the scrapbooking technique. Even a beginner can do this. Your desire, imagination and a little patience will definitely lead to success.

Initially you will need a small set of tools and materials:

When you have acquired everything you need, all that remains is to decide on the style and design of the craft, be patient and boldly start creating. Postcards, as a rule, are dedicated to some significant event: New Year, Valentine's Day, Birthday. The nature of this event will tell you what style to choose for decorating your postcard.

You are absolutely free to use decorative elements. You can use anything: scraps of fabric, beads, dried plants, coins, stamps, lace, buttons, multi-colored threads and ribbons.

In the future, of course, you will want to replenish your tool collection with many different stamps, hole punches, paints and varnishes, inks and decorative elements. You may have a desire and need to purchase more professional equipment, such as an embossing and cutting machine or even a cutting plotter. There are no limits to improvement!


A few tips to help you get started on your creative journey:


And in the end I would like to add that scrapbooking is great entertainment and an opportunity for creative improvement. Many even believe that scrapbooking has a certain therapeutic effect.

And always remember, by creating our works, we make this world a little better and today we save our yesterday for tomorrow.


Since last year, the pages of the magazine have been discussing the rules for filling out and...

The sales department is one of the main departments of the company because it...
